ROTOR’s top toolbar includes from left to right:
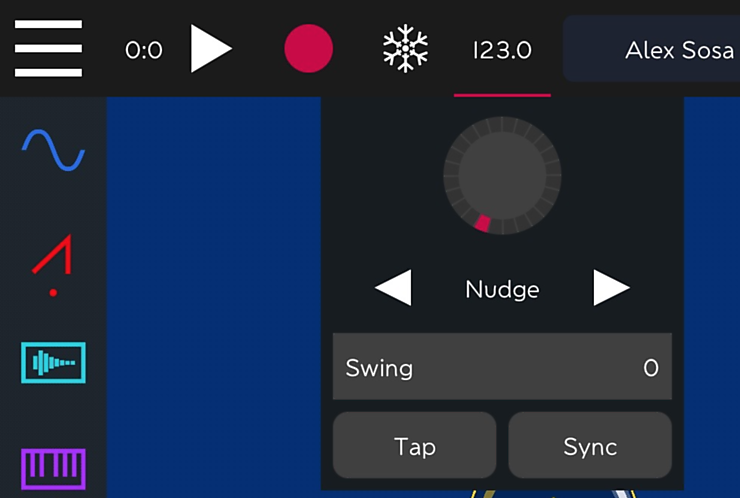
ROTOR top toolbar
ROTOR transport commands include:
Each time recording is set to OFF, the resulting audio recording will be automatically saved as a wavefile (16 bit, 44.1KHz, stereo), with a automatic name including YYYY-MM-DD_HH-MM-SS, and it will be stored in the ROTOR’s document folder of your iPad. From there, using iTunes, you can rename it, copy it or move it to another folder, application or device.
These recorded wavefiles will also be directly available from ROTOR load wavefile windows, so that they can reloaded into the application - as new loops - with just one single touch (see section 3.2.3 on how to load your own wavefiles and loops.)
This window brings different ways to operate with tempo:
It is important to remark that, by default, ROTOR provides automatic pitch-shifting/time-stretch functionalities, so that changing the tempo of any song will not affect its pitch. Additionally, any ROTOR session can combine loops originally recorded at different BPMs. When loading any loop or wavefile for a new session, ROTOR will deduce its original BPM and apply any needed correction so that it will be played at the song tempo while keeping its original pitch. More details on how to manage - and optionally override - this behavior is given in section 3.3 and section 3.7.1.
TIP: When using rotors, the freeze mode allows for a much faster interaction, since it doesn’t require the user to place rotors in a precise position. Once a virtual object has been captured by a rotor, you can keep moving and rotating the rotor, which will remain linked to the virtual object, while the user keep touching it and it is not lifted from the iPad surface.
Interactive help mode provides a short description of any item you touch in the application.
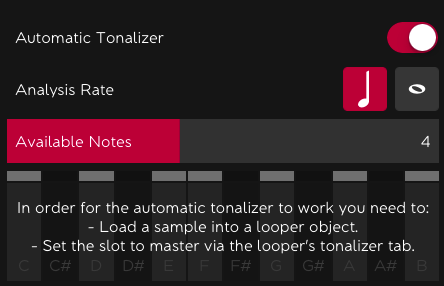
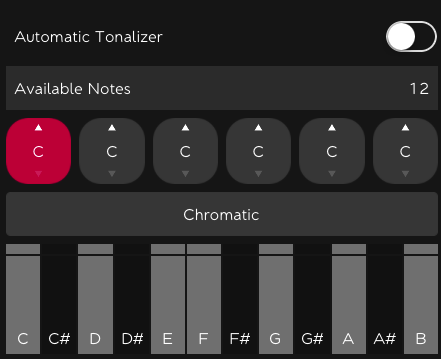
Automatic harmony control is one of ROTOR’s most innovative and handy features. It can be very useful for those users that do not know much music theory or do not have a perfect ear. Tonalities can be automatically computed (Automatic Tonalizer ON), or defined by the user (Automatic Tonalizer OFF).
When set to Automatic, ROTOR analyses the wavefile(s) that has/have been set to master (section 3.5.2), and automatically computes the tonality based on advanced music analysis techniques. Settings for this option include:
When running in this mode, the 7 notes currently compute appear always labelled in white, at the bottom of the panel.
In manual mode, the user can choose both a scale (or mode or chord), plus the fundamental note upon which to build this selected scale. Each combination of fundamental + scale sets a harmonic preset, which on its turn, defines the subset of correct notes (out of the 12 totally available). The cardinality of this subset will be 7, 5, 4 or 3, depending on the type of scale, mode or chord chosen.
There are 6 available slots for storing user-defined harmonic presets. Touching any of these presets will highlight it in red, turning it into the active preset.
Automatic harmony is very linked to the way ROTOR manages loops, wavefiles, samplers, synthesizers and sequencers, this feature is further documented in depth in the next chapters when considering loops (section 3.6), and sequenced notes (section 5.6).
That said, in summary, ROTOR’s tonalizer allows to:
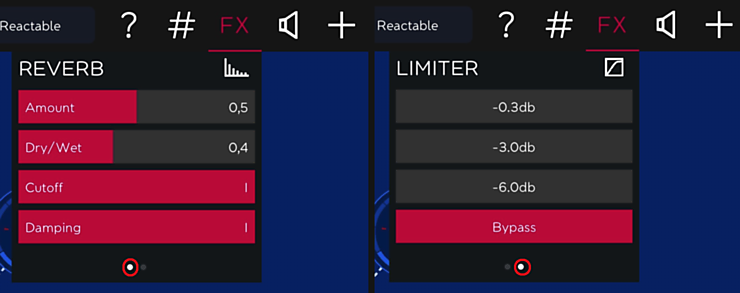
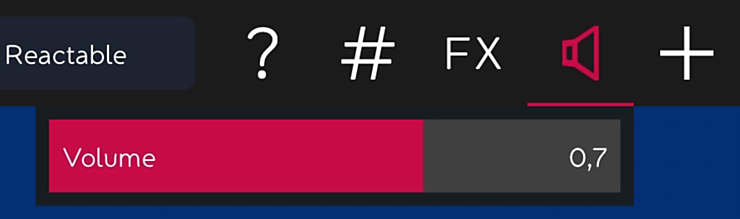
Touching the [FX] and the speaker icons will respectively open the global effects and global volume panels.
The global effects panel has two tabs that can be switched by touching the two white dots at the bottom of the panel. These global effects, which include reverb (first tab) and limiter (second tab) are automatically applied to the whole output mix.
Reverb and Limiter tabs in the FX panel
(red circles at the bottom are highlighting the “switch tab” icon)
Global Volume control
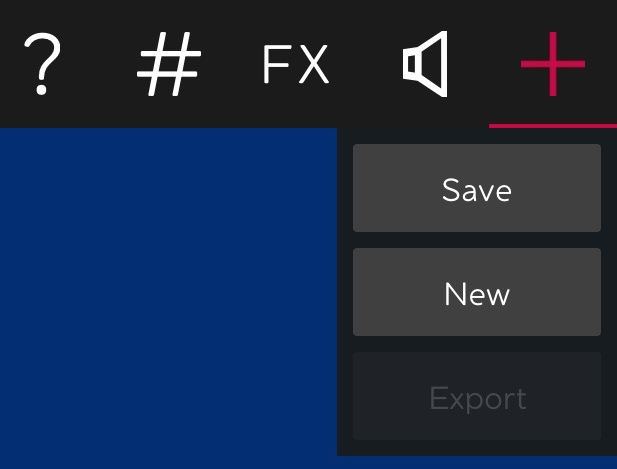
Touching the [+] icon brings the option to save the current session or to create a new empty one from scratch.
TIP: Saving a session is very different from recording a mix to audio. The latter is done in real-time while performing, and creates a wavefile, whereas the former saves the session settings, including all the configuration parameters of all of its sound modules (e.g. which loops are loaded and how they are distributed among the objects). Since a saved session just includes settings information, it does not occupy much disk space, and users are therefore encouraged to save as many session variations as they like.
TIP: The Save and New session commands are accessible from the [+] icon, in the top toolbar. Loading a session is done from the menu settings.
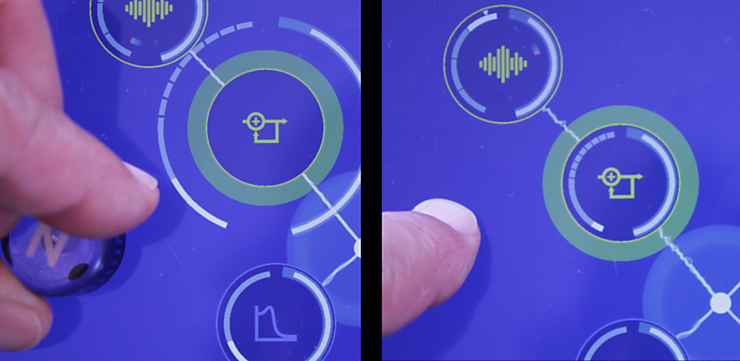
Rotor controllers have been specially designed for bringing physical and tangible control to ROTOR. This means that while all standard multi-touch capabilities are preserved, with rotors you will also be able to control any parameter by moving and twisting our tangible pucks over the iPad’s surface. Rotors can be purchased independently from the ROTOR app at http://reactable.com/rotor/.
Smartphones and tablets use capacitive screens. Because of the limitations of this tracking technology,
rotors are only detected when they are being touched by the user.
For this reason, and also because of the reduced size of tablets screens, specially when compared to tangible
interactive tables such as the reactable, rotors are not permanently associated with any specific ROTOR sound module.
Instead, they are temporarily linked to any virtual object they capture on ROTOR sound canvas.
With rotors, you will be able to:
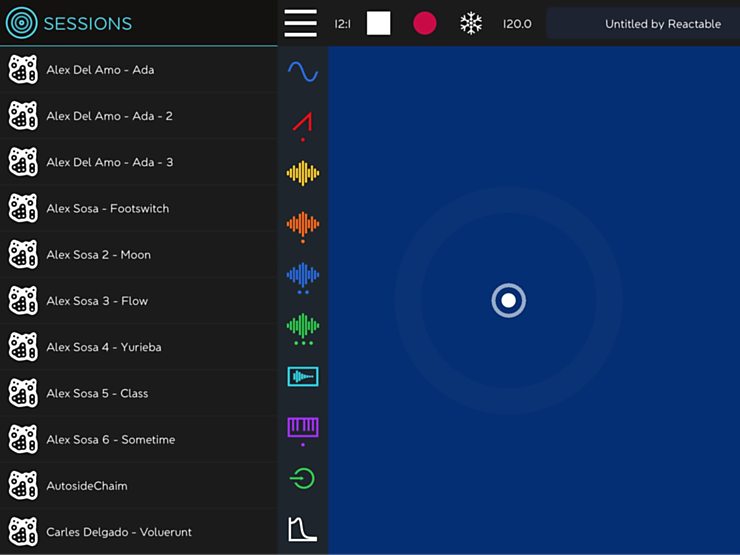
Touching the MENU icon, at the left of the top toolbar, opens a menu at the left of the screen, which includes several sections: SESSIONS, DEMOS, TUTORIALS, SETTINGS and HELP. For closing any subsection in the menu, just touch again the section title (now in light blue) at the top-left corner of your iPad, which will bring us back to the main menu. For finally closing this menu, just touch again the MENU icon.
This panel shows in alphabetical order the list with all the ROTOR sessions you have created in the device. Touching any of these will automatically open the corresponding session.
TIP: If a session is selected while ROTOR is in PLAY mode, the new selected session will start playing directly once loaded.
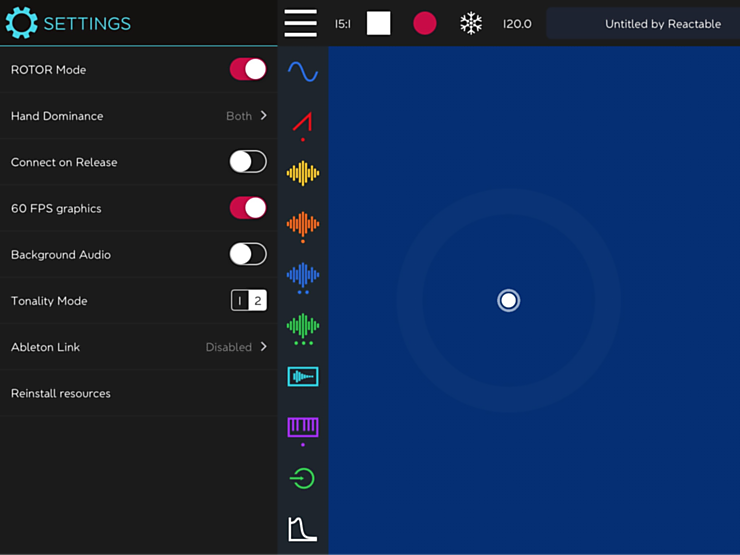
The SETTINGS panel includes 8 options.
Following we describe each of these options. Default options are highlighted in red.
Configuring this option is specially handy when using rotor controllers. When a rotor is placed on top of a virtual object, it captures the object, allowing to control some of the object’s parameters by rotating the rotor. Yet, some other parameters are still controllable by touch. The three different options are provided for you to choose the best way for minimising occlusion.
Left and Right are specially conceived for left/right handed people respectively, assuming that when using one rotor, you will prefer to hold it with your dominant hand. This will display the touch-controllable parameters at the opposite side of the object.
When Both is selected and a rotor controller captures a virtual object, its parameters expand on both sides.
This mode is better suited for advanced users that prefer to use two simultaneous rotors, one for each hand.
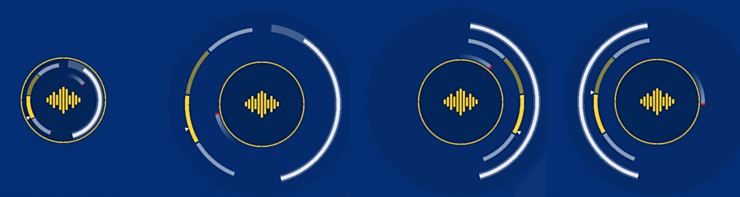
The following pictures respectively show
(1) an object before being captured by a rotor,
(2) an object captured by a rotor with Both setting,
(3) an an object captured by a rotor with Left setting
(4) an object captured by a rotor with Right setting.
(1) The object is not selected; (2) object selected with BOTH; (3) object selected with hand dominance LEFT (widgets appear at the right); (4) object selected with hand dominance RIGHT (widgets appear at the left).
Note that this special visual feedback is only activated when using rotor controllers.
This option determines how new connections between modules are set:
TIP: Connect on Release ON leads to a more “conservative” and less dynamic connecting style.
OFF can be more dynamic and improvisational.
As a downside, it can cause more undesired connections.
Although both modes are compatible with rotors, OFF feels more natural and is therefore recommended when using them.
60 FPS produces smoother graphic animations. It is recommended unless you have an older iPad model or need to save battery and computing resources.
When Background Audio is ON, the application continues sounding when it is set in background.
These represent 2 different algorithms for the automatic detection of the tonality or key of the loops. Mode 2 is more grounded on music theory, and thus tends to produce more traditional results.
When Ableton Link is ON, ROTOR looks for other Ableton Link compatible applications running in the same network on other devices (smartphones and laptops), and connects to them for playing in sync, sharing BPM and phase. This feature is explained in detail in section 5.4.5.
This reinstalls all the factory media resources, such as loops, tutorials, etc. that come with the bundle.
ROTOR is based on the concept of modular synthesizers. It combines several objects, each of which represents a different sound module. There are 3 different types or families of sound modules, namely:
Following we briefly describe each of these 3 families.
Sound generators are the only modules that can produce sound, and they also come in different flavors. We have already introduced the loop players (section 1.3), and samplers and synthesizers (section 1.6).
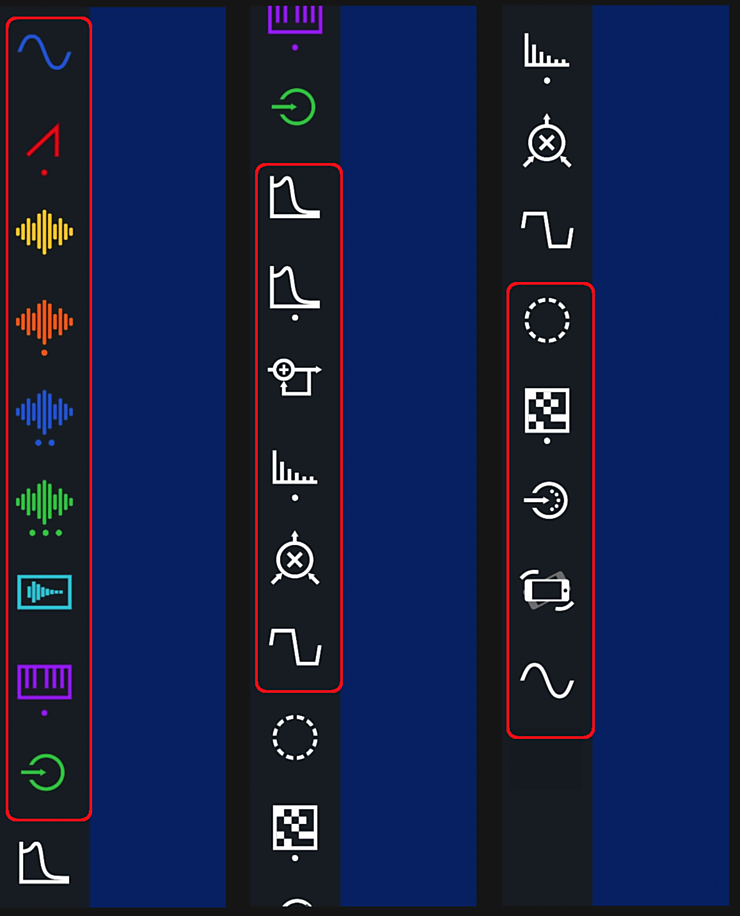
Sound generators occupy the first 9 top positions in the dock (where they are the only colored objects).
Screenshots of the dock showing respectively:
the generators (left), the effects (center) and the controllers (right)
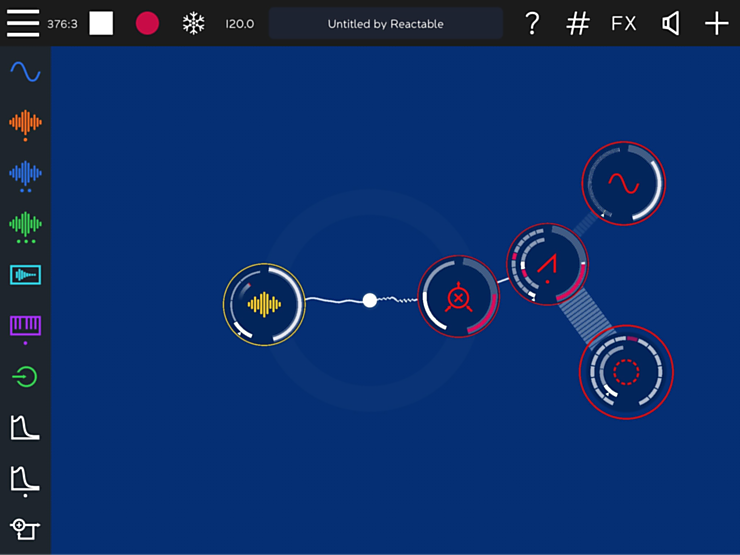
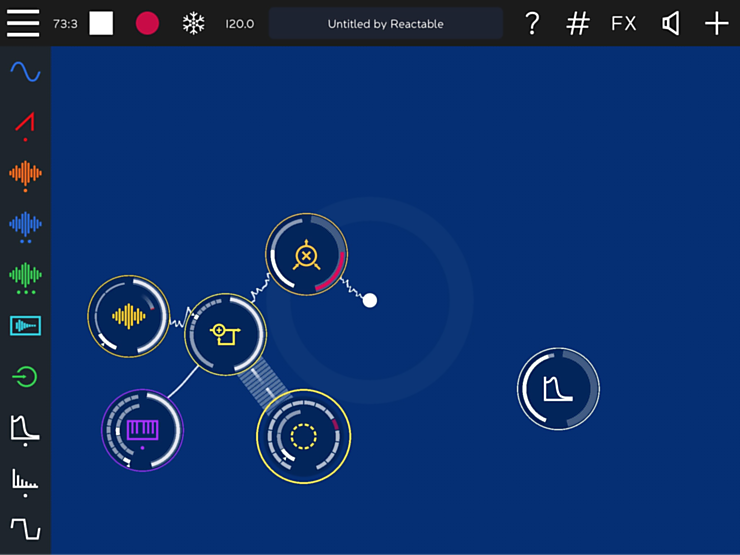
Screenshot showing an independent generator (yellow loop player, at the right), and a composite thread (red, at the left) consisting of a synth generator (triangle) processed by a ring modulator effect (circled X) and controlled by 2 controllers (a sine LFO, and a sequencer)
Sound effects cannot produce any sound on their own. Instead they process and modify the sound they receive from other objects (i.e. a sound generator or another effect).
There are four main types of effects:
Sound effects occupy positions #10-15 in the dock. Their icons are all white. This is because once in the canvas, they will get the colour of the object they are processing. (when receiving several simultaneous input threads, their color will change dynamically, depending on the instantaneous amplitude level of each of their input).
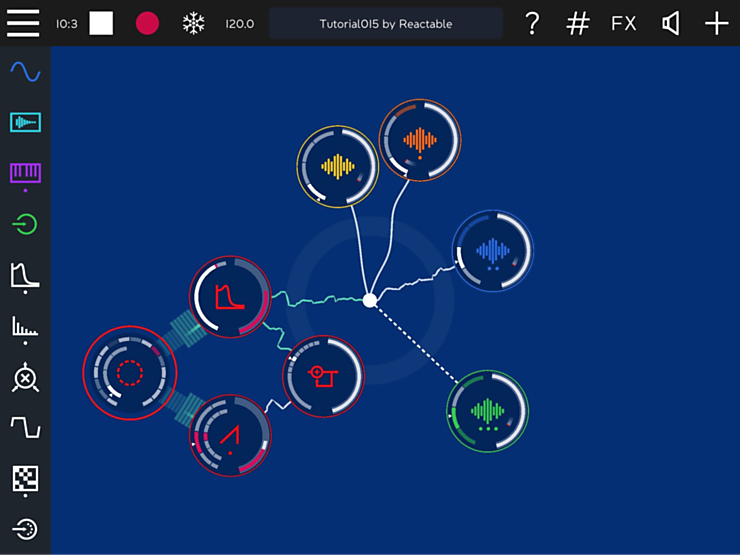
Screenshot showing an independent effect (white filter at the right) and a thread (yellow and violet, at the left), consisting of: delay simultaneously processing a loop player (yellow waveform) and a sampler (violet keyboard), being controlled by a sequencer (yellow dotted circle), and further processed by a ring modulator effect (yellow circled x).
Controllers do not emit neither process any sound. They output control information that will modify the behavior of the objects they are connected to, which can be both sound generators and sound effects (but not other controllers). They cannot receive any input either, but they are the only objects that can send its output to several simultaneous objects (i.e. they can multiplex their output). For multiplexing, hard connections need to be established.
There are 4 main types of controllers, namely: sequencers, MIDI IN, accelerometer, and Low Frequency Oscillators (LFOs). They occupy the last 5 positions in the dock and, like effects, their icons remain white until they get connected to an object (when sending to several simultaneous objects, controllers will take the color of the last object they connected to.)
In this screenshot the sequencer controller (left) is controlling 2 objects simultaneously, a filter (up) and a synth (down).
We have seen that sound modules in ROTOR are classified into 3 big families (sound generators, sound effects and controllers), and that each of them includes different types.
But things are even richer, since these types can, on their turn, be configured to show different behaviors (or subtypes).
We can thus think of a 3-level tree structure which includes: Families > Types > Subtypes.
All the availables families (1st column), types (3rd column), and subtypes (5th column) are summarized in the following table, which also documents:
| Family | IN and OUT | Type | # | Subtype |
|---|---|---|---|---|
| Sound Generators |
Multiple control INs from simultaneous controllers One audio OUT (to an effect or to the final audio sink) |
Loop player | 4 | BPM-adaptive |
| Fixed Duration | ||||
| Free Duration | ||||
| Sampler | 2 | Soundfonts | ||
| Wave-Based (user configurable) | ||||
| Oscillator | 2 | Sine | ||
| Saw | ||||
| Square | ||||
| Noise | ||||
| Audio Input | 1 | Channel 1 | ||
| Sound Effects |
Multiple audio INs from simultaneous sound generators and/or sound effects Multiple control INs from simultaneous controllers One audio OUT (to an effect or to the final audio sink) |
Filter | 2 | Low-Pass |
| Band-Pass | ||||
| High-Pass | ||||
| Time-based effects | 2 | Delay with feedback | ||
| Beat-Repeat | ||||
| Reverb | ||||
| Modulator | 1 | Ring Modulator | ||
| Chorus | ||||
| Flanger | ||||
| Waveshaper | 1 | Distortion | ||
| Compressor | ||||
| Bit-Crusher | ||||
| Low Frequency Side-Chain | ||||
| Controllers |
No input Several simultaneous OUT (to any sound generator or sound effect) |
Sequencer | 2 | Monophonic (step sequencer) |
| Polyphonic | ||||
| Random | ||||
| MIDI In | 1 | MIDI In | ||
| Accelerometer | 1 | Accelerometer | ||
| Low Frequency Oscillator (LFO) | 1 | Sine | ||
| Sawtooth | ||||
| Square | ||||
| Random |
Looking at the previous table you can see that some types have more subtypes than possible simultaneous instances (notice that the number of instances coincides with the number of related icons available on the left dock).
TIP: When you drag an object from the dock into the canvas, you are placing in the canvas a given type of object (e.g. a Sequencer) but not a subtype (e.g. not a monophonic step-sequencer). After that, at any moment during your performance (i.e. even while recording), you can change any object subtype by double-tapping it.
Double tapping any object placed on the sound canvas, will open this object’s configuration panel. On its first (leftmost) tab, this panel will show all the available subtypes associated with that object. Touching any of these icons in the panel will instantaneously change the subtype (and also the icon) of the associated object in the canvas.
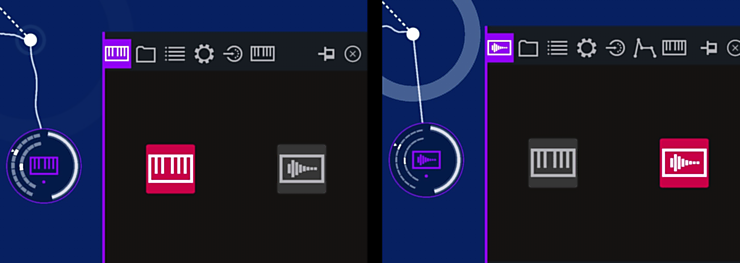
Double tapping the keyboard object open its panel (in its 1st tab) showing the object’s available subtypes (in that case 2) and highlighting the subtype currently active. Touching the other subtype changes the icon of the object in the canvas (and also the icon of the 1st tab within the panel).
We have just seen how to change the subtype from the objects panels. But panels provide many more functionalities than just allowing to change an object’s subtype. For this reason, panels do typically provide several tabs. The number and appearance of these tabs will vary depending on the object type and, in some cases, also of the object subtype. In any case, the first (and leftmost) tab will always be the “select subtype” one, and its icon will vary according to the currently selected subtype, as seen in the previous two figures.
Several tabs, such as the envelope, MIDI, the virtual keyboard or the 2D control panel, are common to many types, while others are type-specific (or even subtype-specific), providing all the available settings for a given object.
We will discuss each panel in depth in the next chapters, as we keep documenting each object type. For now, suffice is to remember that:
We have already covered connections implicitly in many points of this manual:
In the current section we will document the visual feedback provided by ROTOR for helping us predict how connections are going to get established or broken.
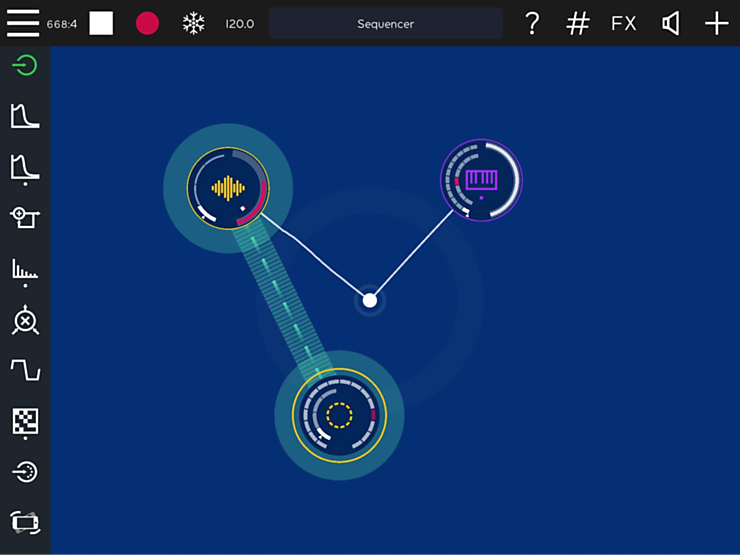
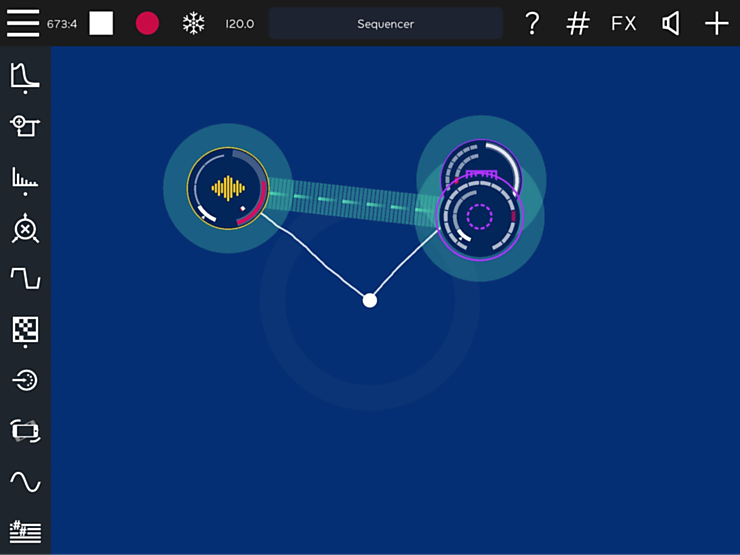
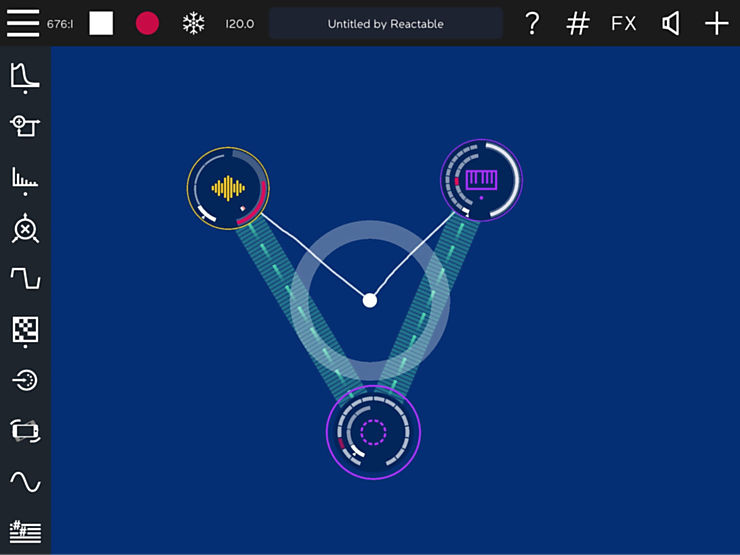
The following 3 figures illustrate a sequence where:
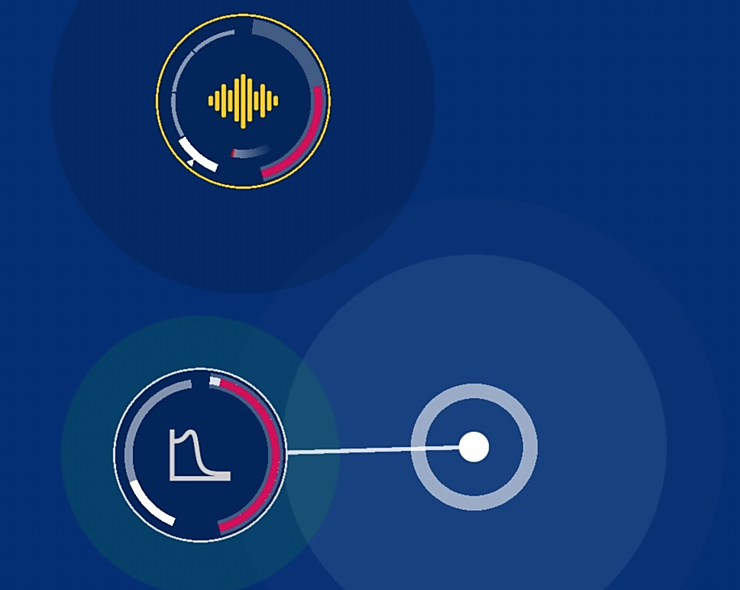
Visual feedback as the loop player gets closer to the audio sink
When more objects can get connected things can also get a bit more complicated. We comment two examples:
In this screenshot, the filter is moving. It is currently connected to the audio sink (their 2 circles intersect), but its icon remains white because it still has no input (i.e. the filter is not filtering anything). For connecting to the yellow loop player above, the filter will have to move up, or the loop player will have to move down (until their 2 circles touch).
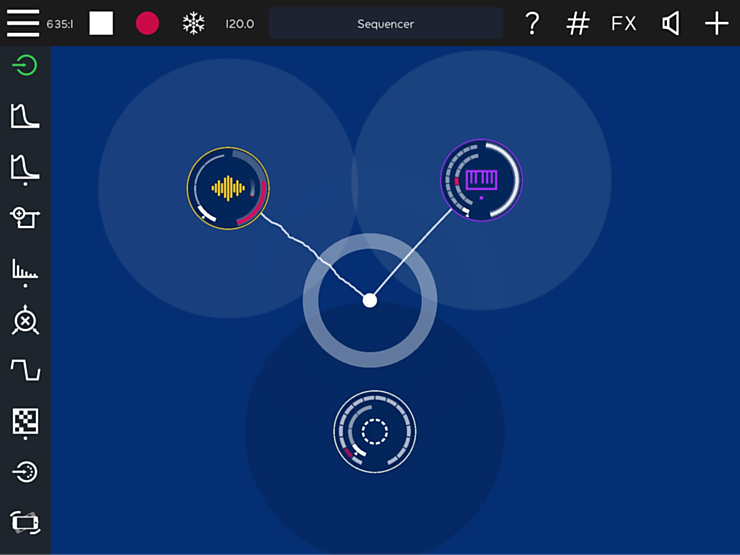
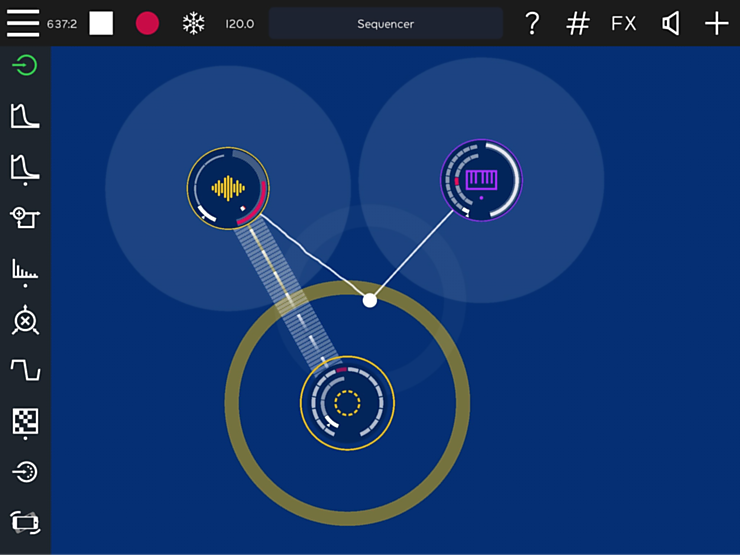
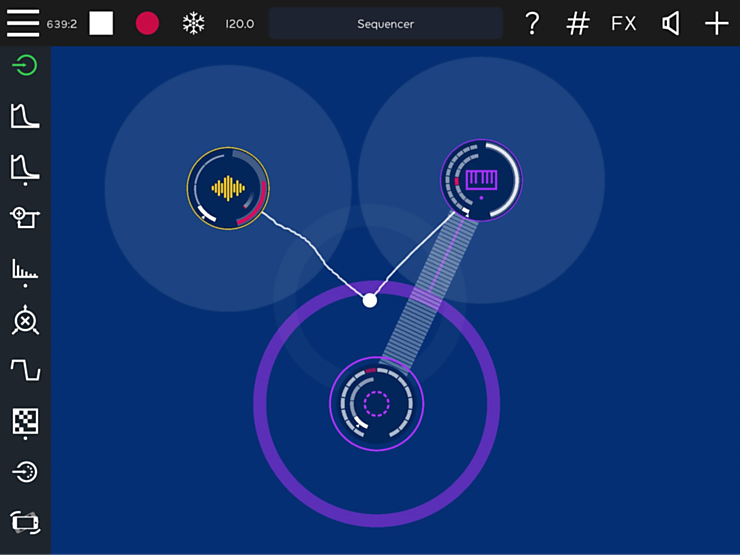
In this screenshot, the white sequencer can connect to any of the 2 generators (a yellow loop player left, or a violet sampler right). The sequencer will connect with the one intersecting first.
The sequencer got closer to the yellow loop player and got connected with it.
The sequencer got now closer to the violet sampler and got connected with it (also disconnecting with the loop player).
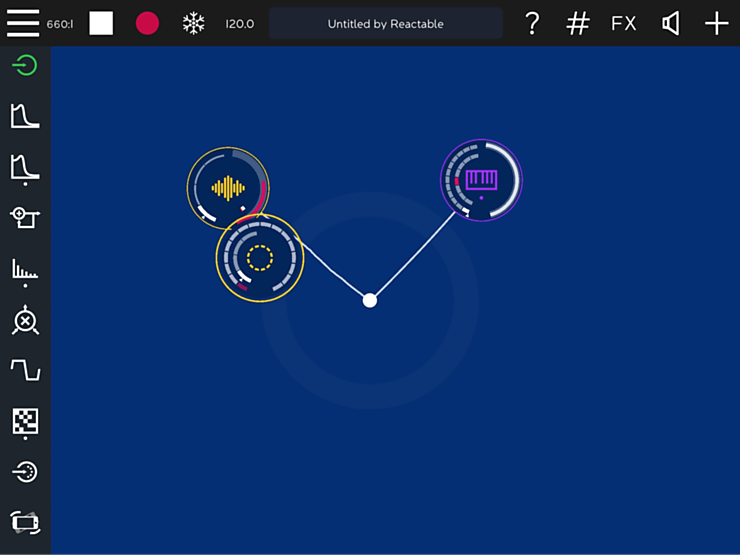
If we wanted to connect the sequencer to both the loop player and the sampler, we would need to do the following:
This is shown in the following sequence of 4 screenshots:
1: The sequencer touches the loop player
2: A hard connection (ligth blue) is established between the loop player and the sequencer.
3: The sequencer touches now the sampler
4: Two hard connections are now established
Unlike the first chapter which was very hands-on, this second one has been a more reference chapter, in which we have covered most of ROTOR menus and its functioning principles. We have also given an overview of the sound modules available in ROTOR and how they are hierarchically organised according to (1) families, (2) types and (3) subtypes. In the next three chapters we will indeed cover each of these types much more in detail, and also with hands-on examples.