3.1 Recapitulation on Loops and Wavefiles
Loop players surely constitute the most used type of objects in ROTOR, and in chapter 1 we already used them extensively. Loop players are also the most powerful and flexible objects in ROTOR. They can be configured in many ways and can be used for many different purposes. This chapter concentrates on exploring all of their possibilities.
Before learning how to use loop players in depth, we will first recapitulate what we learned about them in the introductory hands-on chapter:

-
There are 4 loop player instances in ROTOR (namely, as shown in the right figure
yellow,
orange,
blue, and
green).
This means that up to 4 simultaneous loops can be playing at any time.
-
Each loop player has 4 slots with only one being the active one. This means that each loop player object can load up to 4 separate wavefiles (one per each slot), but can only play one wavefile at a time. The active slot is highlighted in white (see figure below).
-
Switching between slots can be done on-the-fly, while performing, using 3 alternative methods (
section 1.3.4
).
-
Switching between slots does not affect synchronization. If we change the active slot in the middle of a loop (or in the middle of a bar of even a beat), the new loop will start sounding in the “right” position (i.e., not necessarily from its beginning, but rather from the current time position of the session, in bars and beats).
-
The current position within the loop is always indicated by a moving circular red trail, as shown in the figure below. The “12:00” clock position marks the beginning of the loop.
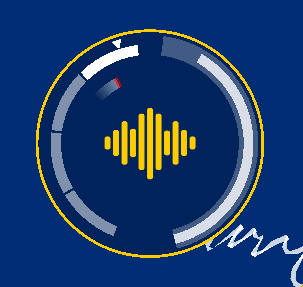
This figure shows a loop player with its 4 slots. The upper slot (white) is the current active one. The red point of the trail indicates the current loop position within the loop (in this example the loop is very near its end-restart).
In the first chapter we only used preloaded loops. In this chapter we will start by learning how to load your own wavefiles into the loop players’ slots.
3.2 How to Load and Organize Your Own Wavefiles
3.2.1 What Type of Wavefiles?
Currently, ROTOR supports uncompressed files in the WAV format and compressed files in the OGG VORBIS format. WAV files are uncompressed PCM data, in mono or stereo, 8, 16, 24, or 32-bits, and at any sampling frequency (44.1 KHz is probably the most typical). Files can be as long as you want, although if you are going to use them for loops you will probably prefer to keep them reasonably short.
Obviously, if you want to use them as loops, it is your own responsibility to cut them “correctly”, i.e. with no silences or gaps at the beginning or the end. You probably already know how to do that in your favorite wave editing program. Otherwise, the Internet is full of text or
video
tutorials that will tell you how to proceed.
TIP
: One important current limitation for using wavefiles as loops and avoiding synchronization issues, is that in ROTOR, wavefiles need to be in 4/4 (i.e. 4 beats per bar) and the number of bars has to be a power of 2 (i.e. 1, 2, 4, 8, 16, 32, … bars). This means that the number of total beats has to be a number of the type 4*2
n
. Tempo can have any value, and by default ROTOR will time-stretch your files so that they play at the BPM of the session (this behavior can also be overridden as we will discuss in
section 3.3
), although if the original BPM of your files falls outside the
74-148
range you will probably need to do a
simple manual adjustment.
3.2.2 Copying Wavefiles into Your iPad
For loading your own wavefiles into ROTOR’s loop players, you will first need to copy these files into your iPad. This is typically done using iTunes, and the process is similar for most iOS applications. If you have never done so, you can consult the following link, which explains how to transfer files to an application's document folder using iTunes:
https://support.apple.com/en-us/HT201301
3.2.3 Loading Wavefiles into ROTOR Loop Players
Let’s assume that your wavefiles are already copied into ROTOR’s documents folder (note that you can also organize them in as many subfolders as you desire).
If you start a new session from scratch, the 4 available slots of your 4 loop player objects (i.e. 16 slots in total) will be all empty. This can be easily seen because empty slots look thinner than loaded slots, as shown in the next figure:
The
yellow
loop player has all slots empty.
The
orange
loop player has only the 2
nd
slot loaded, others are empty.
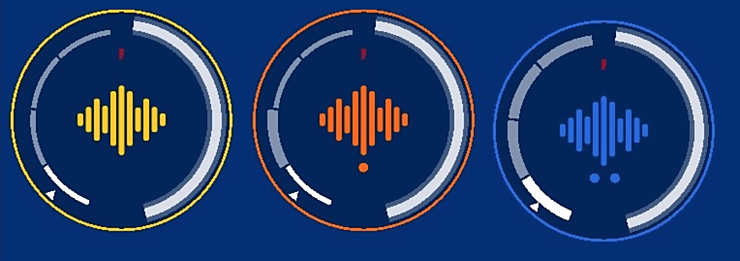
The
blue
loop player has all 4 slots loaded.
Notice that independently of being empty or loaded, in all 3 loop players the active slot (
white
) is the 1
st
(bottom one).
For loading your wavefiles into the loop players, follow the steps below:
-
Select from the canvas, the loop player object where you want the files to be loaded.
-
Double tap on this loop player for opening its panel.
-
Select the
list
icon (2
nd
icon) from the
panel
.
-
In the the loop player object, select the slot in which you want to load the wavefile.
-
If your wavefiles are organised in subfolders, navigate until you choose the folder with the desired wavefile (note that folders are listed in yellow; files are listed in white).
-
Touch the desired wavefile. The slot should now look “loaded”.
-
If you change opinion and want to select another wavefile, just repeat 6.
-
If you want to empty the selected slot, touch the
eraser
icon from the panel.
-
For loading the other remaining slots of the same loop player, activate another slot (step 4) without closing the panel, and select a new wavefile (step 6). Once the 4 slots of one loop player are loaded, you can close this panel, and open the panel of another loop player (steps 1-3) for repeating the process.
-
Saving the session
will save all the assignments (wavefiles->slots) you have done.
-
Notice also that when you select a loaded slot and open the panel in the list tab, the loaded wavefile will be highlighted in the list.
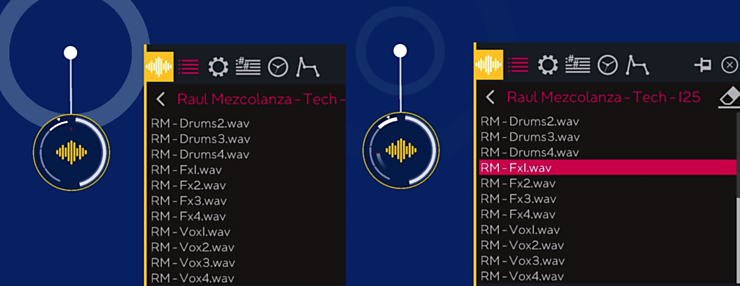
The 4 slots are empty (left). A wavefile is loaded into the 4th slot (right).
3.3 Three Ways of Using Wavefiles
Now that we know how to load our own wavefiles into ROTOR, we will see what differences do the three available loop player subtypes bring. Opening the loop player panel on its first tab displays 3 subtypes, symbolized respectively by a waveform, a waveform with a lock, and a waveform with a turntable, as illustrated in the next figure.
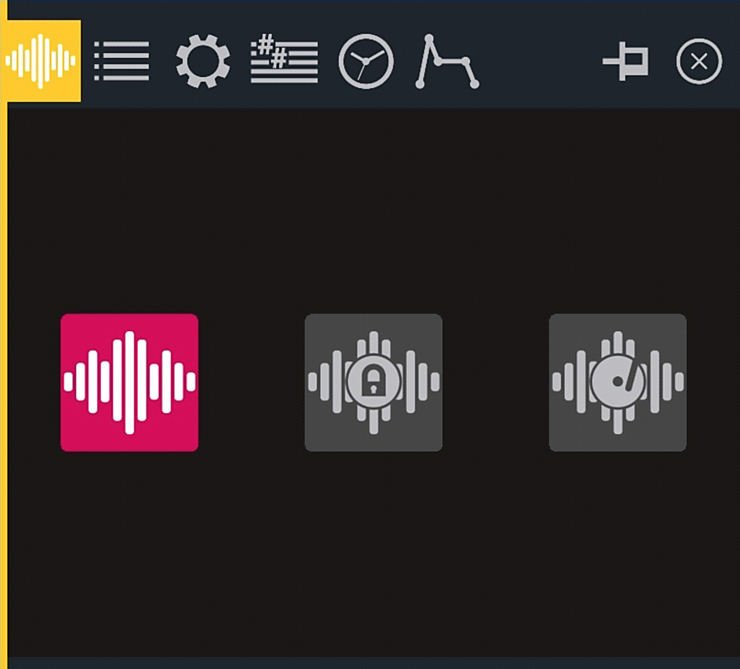
The loop player main tab showing its 3 available subtypes, namely: the BPM-adaptive, the fixed duration and the free duration loop players.
The icons and the names should already provide some hints about these subtypes.
3.3.1 The BPM-Adaptive Loop Player
This is the default subtype and the only one we have used until now all along the 1
st
introductory chapter. When a wavefile is set to this subtype, the duration of the loop will change according to the BPM of the session, while its pitch will remain unaltered. This is probably the subtype most users will be selecting most of the times.
3.3.2 The Fixed Duration Loop Player
As it name indicates, when set to this subtype, the duration of a wavefile does not vary, independently of the BPM of the session. The file will be always played at its original speed. This might be useful for spoken voice, field recordings, special sound effects, or any audio material that doesn’t need to be synchronized to the tempo of the session.
3.3.3 The Free Duration Loop Player
In this mode, a wavefile behaves more or less like a vinyl record that can be sped up or down, reversed, stopped, scratched, etc. When a wavefile is set to this subtype, the look of the loop player object will change, and one continuous slider will substitute the otherwise four available slots. This is so because the playback speed of this loop can be altered in a continuous fashion, just moving the left slider or using a
rotor
controller.

Three free-duration loop players set to different speeds: in the
left-yellow
, the speed is set “between 9:00 at 12:00”; in the
central-blue
, the speed is “at 9:00” causing the loop to almost stop (no red trail); in the
right-orange
the speed is set “between 9:00 and 6:00” and we can see the red trail moving anti-clockwise, meaning that the sound is playing backwards.
When the slider is in its exact middle position (imagine at “9:00” in a clock) the loop will stop. Going from 9:00 to 12:00 will progressively speed up the loop, while going from 9:00 to 6:00 will speed it up backwards (it will play in reverse). Moving quickly up and down around 9:00 will cause a scratch-like effect. The original speed is attained at approximately 10:00, while the maximum speed attained at 12:00 (and at 6:00) corresponds
to 3 times (respectively -3 times)
the original speed.
TIP
: Since subtypes can be changed on the fly, while performing, you might think of them as special effects that can be used from time to time. This is especially handful when considering the free duration loop player subtype.
The previous tip means that you can just load your 4 loops into a loop player object assigning them the default BPM-adaptive subtype. Then, at any moment, you can just change (from the object’s panel) the subtype of the loop being played, setting it to free duration, do some scratching, play the sound a little backwards, and then go back to its regular BPM-adaptive behavior, at which point the loop will magically resynchronize with the rest of the track!
Tutorial T31 SamplerPlayer demonstrates the use of the same wavefile, with the 3 types of loops.
For a more advanced application of the same concept, try the Morpher demo which also employs multiple instances of one only wavefile in diverse settings.
3.4 To Loop or Not to Loop (and Other Looping Options)
After a while talking about loops, we will tell you now that it is not strictly necessary for your wavefiles to play always looped! This and other loop-related options are available on the loop player main
settings
tab, shown below.
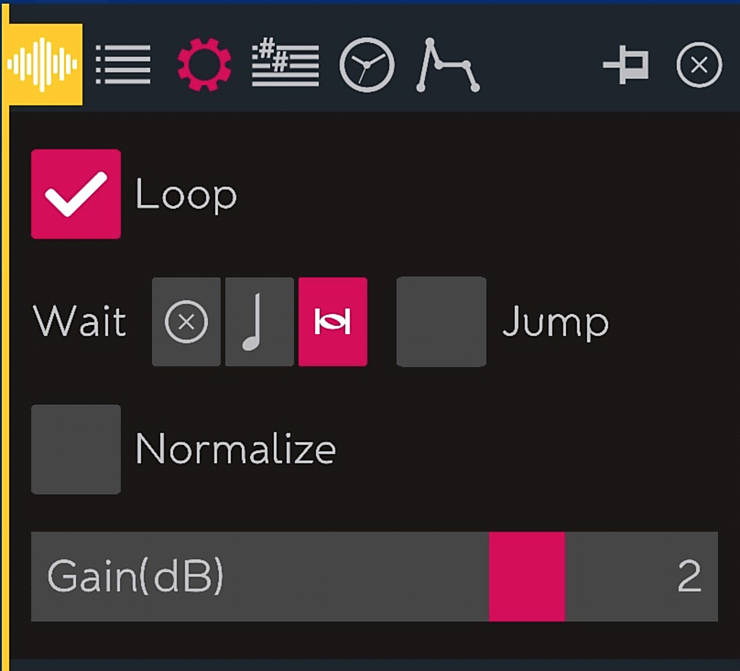
The loop player main settings tab
3.4.1 Loop Toggle
The
Loop
toggle indicates exactly that: should the file play in loop or not? When set to NO, the wavefile will just play once (One Shot), every time the slot is selected (also every time it is triggered by a sequencer, which we detail in
section 3.8.2
).
3.4.2 Wait and Jump
Let’s assume that we have one loop player fed with 4 loops, one in each slot, and that we keep jumping between them 4 just by moving our rotor or our finger. When should these loops changes happen? Instantaneously or “on time” with the rest of the session? This is indeed the behavior that these two parameters control.
-
Wait
has 3 values:
no wait
,
wait for next beat
and
wait for next bar
, that indicate when the slot change will really take place.
Imagine that we have changed the active slot a little after the start of the 2
nd
beat of a given bar. If set to
no wait
, the change will take place immediately, independently of when we are in the song. If set to
next beat
, the loop will start sounding at the exact beginning of the 3
rd
beat. If set to
next bar
, the loop will not start until the end of the 4
th
beat, that is at the beginning of the 1
st
beat of the next bar. If unsure,
next bar
is probably the safest option (and also the one that will make you wait more).
-
Jump
Y/N is specially relevant when
wait
is set to
next beat
. In that case we can want our loop to start from the beginning (
Jump = N
), or from the same beat as we currently are in the session (
Jump = Y
). That is, if for example the loop is going to change in the 3rd beat of the current bar, with
Jump = Y
, the loop will also start from its 3rd beat. Our recommended value would be to set
Jump = Y
when
waiting to next beat
.
Notice that the case
wait to next bar
and
Jump = Y
,
will only have a certain effect when our loops have more than one bar.
3.4.3 Normalizing and Gain Adjustment
Wavefiles can have different origins and thus different levels.
Normalize
automatically adjusts the
peak
level of the wavefile to the maximum possible without distortion. Alternatively, you can also set the
gain
manually.
3.5 Master vs. Slave and Other Pitch and Tonality Adjustments
3.5.1 Masters and Slaves
IMPORTANT
: For this section first set
Automatic Tonalizer ON
in the top toolbar, as highlighted in the next figure:

Activating the Automatic Tonalizer
The following tab incorporates one of ROTOR’s most innovative features. ROTOR does not only apply time-stretching, meaning that when playing a loop at different speeds it makes all the needed computations for preserving its original pitch. It can also do pitch analysis and pitch correction for you!
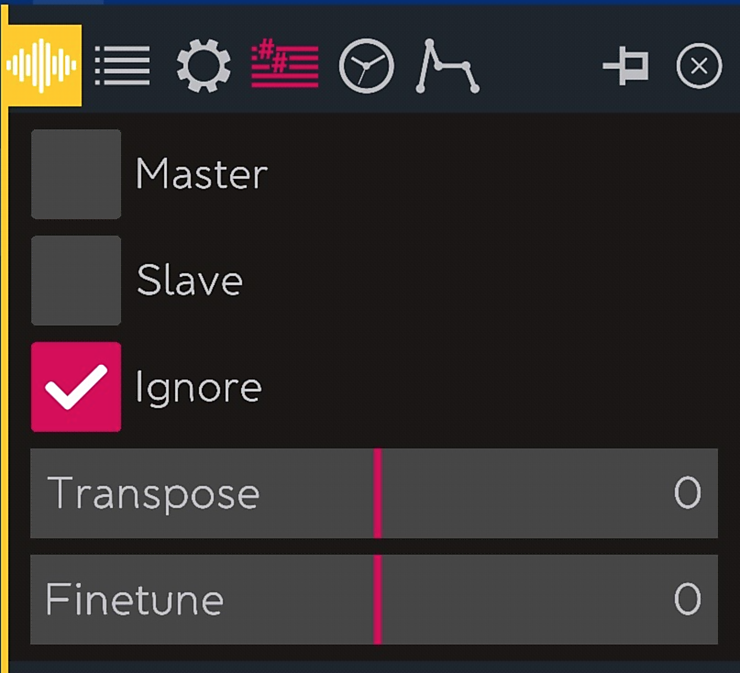
The pitch adjustments tab
Imagine you have several loops, all of them with some melodic or harmonic content (i.e. they are not drum loops, for example). You would really like to use them together in a song, but when you try to play them simultaneously, something doesn’t sound right! Loops seem to be in different keys and the resulting mix is a bit of a cacophony! This is when this tab comes to your rescue.
By default, all wavefiles are set to
Ignore
. This is the normal behavior on most conventional music software: wavefiles remain as they are and their key or tonality does not change. In ROTOR this
Ignore
setting should also be the choice for drum loops and other unpitched material, such as spoken voice, field recordings, effects, etc., i.e. all sounds that do not have a clear pitch.
For the other wavefiles, the ones that contain melodies, basslines, chords, pads, vocals, etc., we have two alternative options:
Master
or
Slave
.
TIP
: When a wavefile is set to
Master
its pitch content is analysed and its tonality computed. These results are then used for correcting the pitch of the SLAVE wavefiles, which are also analysed and which might be automatically transposed for matching better with the key of the MASTER wavefiles.
TIP
: Although it is perfectly possible to have several simultaneous
Master
wavefiles, results will be more predictable when only one
Master
is controlling at a time. For this reason, the simplest configuration would be to choose one and only one loop player object as the master, setting to
Master
its 4 wavefiles (i.e. its 4 slots). This configuration guarantees that no more than one wavefile will be
Master
at a time, and that if the corresponding loop player is playing, there will always be one
Master
.
TIP
: If you really want to work with several simultaneous masters,
Tonality Mode 1
(configurable in the SETTINGS Menu)
will probably work better than
Mode 2
, which “knows more about music” and therefore assumes more orthodox tonal content.
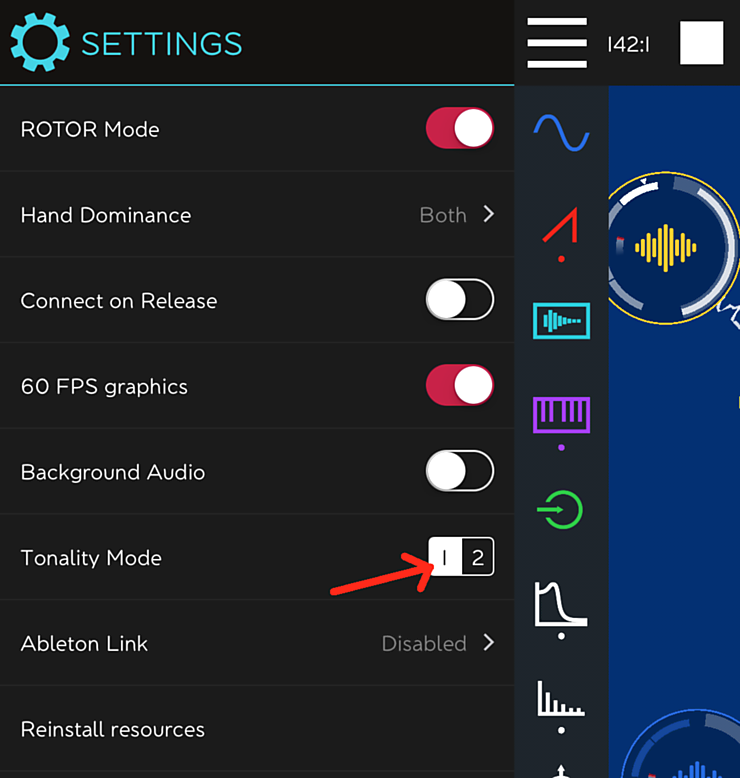
Changing the tonality algorithms
Which wavefiles should be set to
Master
? How to choose the best
Master
candidates?
TIP
: All wavefiles with pitch content could be set to
Master
, but the “clearer” their melodic or harmonic content, the better. If you plan to use wavefiles with chords, these are probably better candidates than wavefiles with melodies (which in that case, could be set to
Slave
). If you are not using chords, probably favor the more varied and high-pitched melodies (vs. the more repetitive or low-pitched ones). Experiment with these settings!
3.5.2 Transposing and Fine Tuning
These two remaining options are only available when wavefiles are set to
Ignore
. In this case we can manually change the pitch of our wavefiles, by +- 12 semitones (
Transpose
) or by +- 50 cents (
Fine Tune
). Note than when wavefiles are set to either
Master
or
Slave
these adjustments are automatically carried by the software.
3.6 The Automatic Tonalizer
3.6.1 Configuration
When starting the previous
section
we have first told you to activate the
Automatic Tonalizer
in the top toolbar. Let’s now take a deeper look at this
Tonality
panel, because its settings will affect the behavior of our master/slave wavefiles.
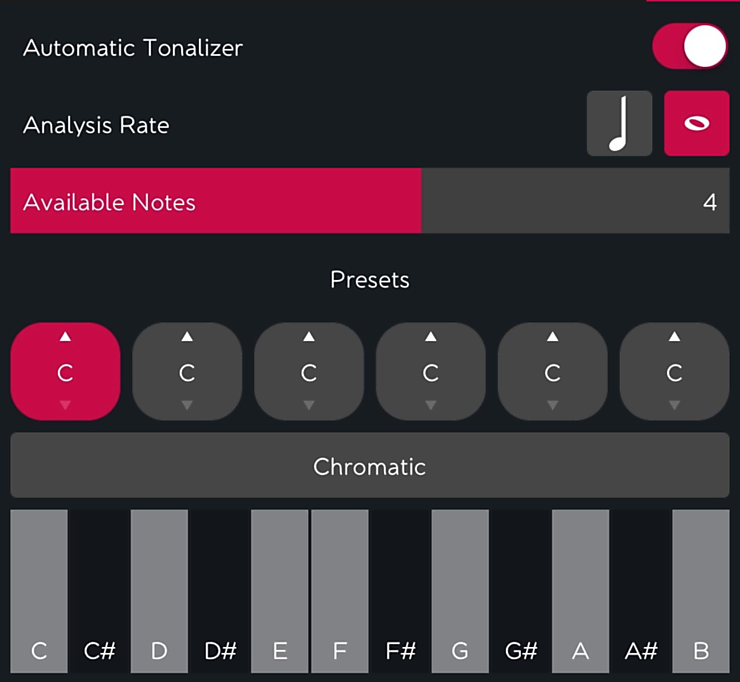
The Tonality panel
The
Analysis Rate
, which can be set to the
beat
or to the
bar
, determines at which rate the audio analysis is updated. Imagine we have some loops set to
Master
, which contain fast chord progressions, changing chords at every beat. If analysis rate was set to
bar
, ROTOR would not tell us about all these variations. It would give us instead an average of all them, only once every bar.
TIP
: Set
Analysis Rate
to the
beat
if you fancy fast harmonic changes. For most of electronic music material though, setting the rate to the
bar
will probably give more convincing results.
Available Notes
[1-7] is a feature that affects only synthesizers, samplers and sequencers, but not loop players. We will discuss it in
section 5.6
.
3.7 Time Adjustments and Envelopes
In this section we review the two remaining tabs available on the loop player panel, the
Time Adjustments
tab (
clock
icon) and the
Envelope
tab.
3.7.1 Time Adjustments
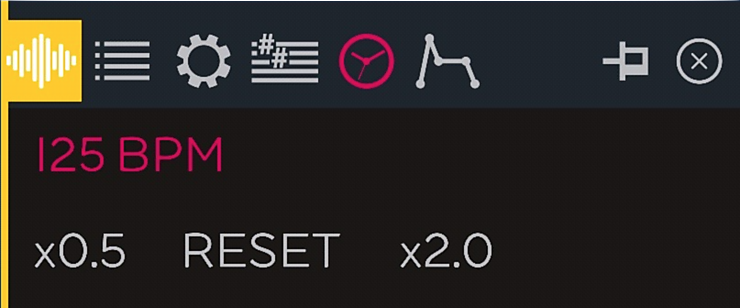 This tab allows to quickly correct BPM analysis errors
When automatically computing the original BPM of our new uploaded loops, ROTOR prioritizes tempo between 74 and 148 BPM (as discussed in
section 3.2.1
). This might cause “octave” errors for tempo outside this range, so that for example a fast drum'n'bass loop at 170 BPM will probably be detected as 85 (i.e. half its real tempo), whereas a slow down-tempo loop at 60 BPM will probably be analysed as having 120 BPM. If any of your uploaded loops sound too slow or too fast when loaded on a loop player, open this tab and correct it using its simple interface.
3.7.2 Envelopes
We first discuss it here, but this tab appears also with other objects such as synthesizers, samplers and many effects (in
section 5.7.4
envelopes are explained in much more detail).
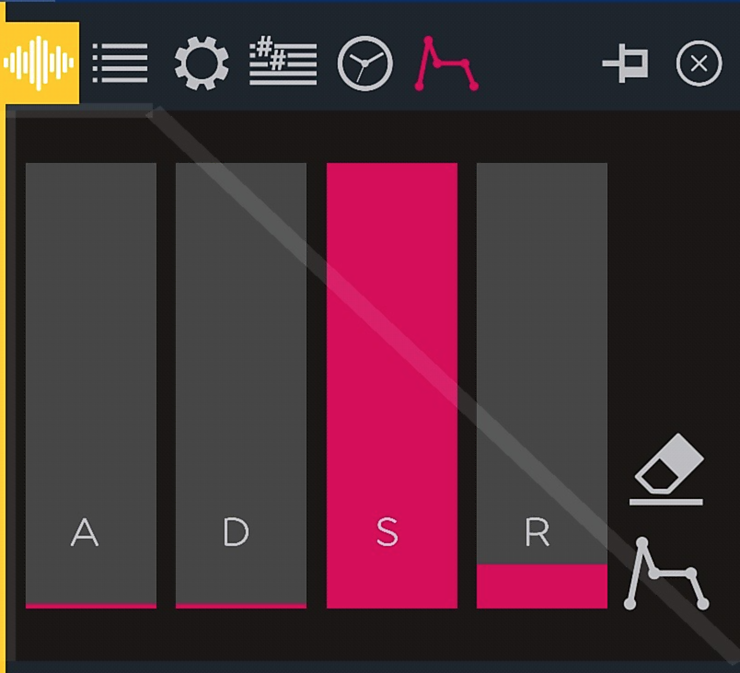
The envelope tab, present in many type of objects (e.g. loop players, samplers, synthesizers, effects, etc.) allows to configure the
A
ttack,
D
ecay,
S
ustain and
R
elease of the sound or effect, when the object is triggered by an event such a keyboard (internal or external) or a sequencer.
Notice that when changing any of the A,D,S,R envelope parameters, an approximate representation of the resulting envelope is superimposed in a lighter grey.
The two additional icons in this tab, namely the
eraser
and
envelope
, allow respectively (a) to reset the envelope so that it has “no effect” (i.e. instantaneous attack, no decay and maximum sustain) and (b) set a “typical” envelope with sustain.
The use of envelopes is not so important with loops, and as a matter of act, envelopes are not triggered when changing between different loop slots, as we have seen until now. But envelopes can become very relevant when combining loops and sequencers, as discussed in the next section.
3.8 Applying Controllers to Wavefiles
In this section we cover several quite special ROTOR features, which can produce interesting effects, hardly replicable with other existing music softwares. ROTOR behaves like a modular system in which many types of objects can be connected to many others, even if sometimes the results might not be obvious, so ...
-
What would be the logical result of triggering a loop with a sequencer?
-
What does it mean to modulate a loop with an LFO?
NOTE
: Sequencers and LFOs will be covered in detail in next chapter, together with synthesizers and samplers. In the next section we will just start seeing some of their potential when used in combination with loop players.
Following we discuss these two particular cases.
3.8.1 Triggering wavefiles with the sequencer / Stuttering
In this figure we can see a loop player being triggered by a sequencer. We have also opened two panels, namely the
loop player > envelope
(top) and the
step sequencer > sequence
(bottom), to show which parameters are more worth checking and experimenting with.
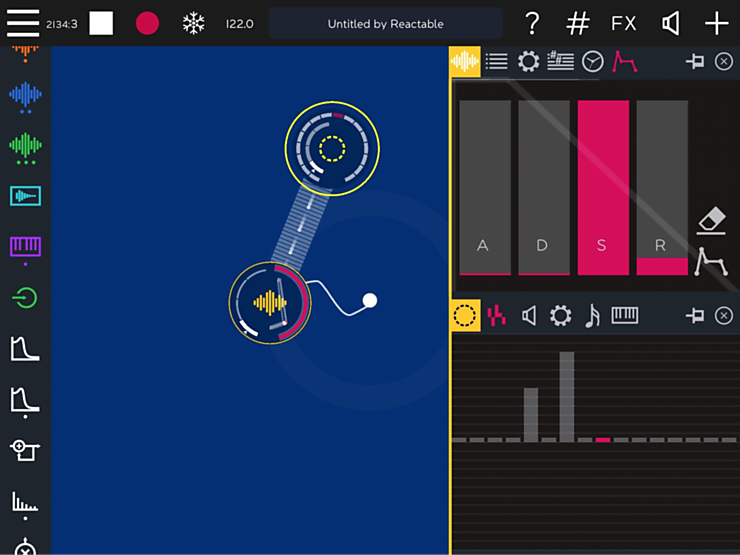
Every time a loop player receives an event coming from a sequencer, its playing position changes instantaneously, meaning that the loop “jumps” from one point to another.
But where and how does it jump?
When the event sent is the “base note” of the sequencer (as all the notes of this example, with the exception of the 5
th
and the 7
th
steps,
as shown on the sequencer panel at the bottom), the new jump position is exactly the beginning of the file. Therefore, sending a sequence with all “base notes” (notes set to zero) will produce the typical
stutter
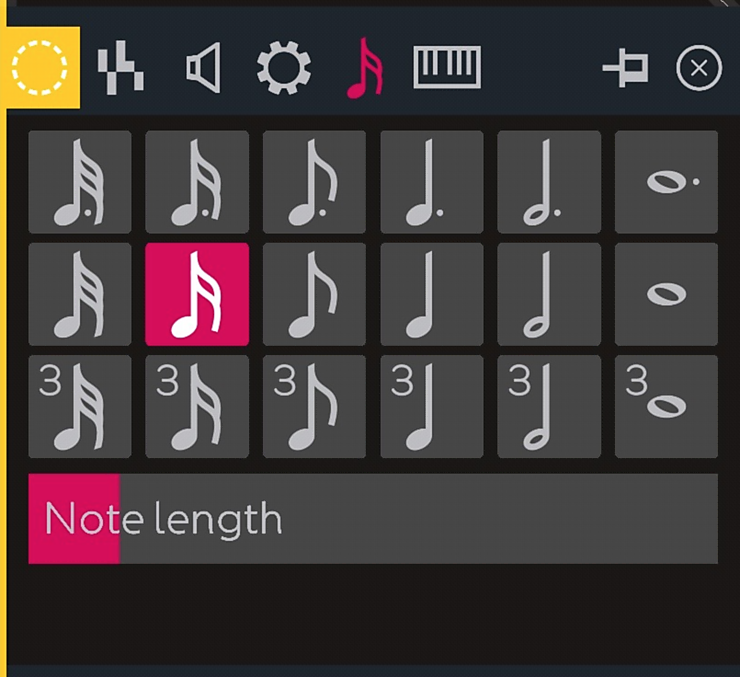
effect so often found in hip-hop and EDM. Notice that since the speed or rate of the ROTOR step sequencer is controlled independently in another panel (check the
note length icon
), the rate of this stutter effect can be easily controlled with one finger touch, for example switching between 8
th
, 16
th
and 32
nd
notes.
Additionally, other pitch values will jump to different positions within the loop. This can be used for example, as a simple, effective and real-time controllable way for playing and jumping within a drum loop “a la drum’n’bass”!
Experiment with T32 SamplerTrigger

In this demo tutorial, the loop player is playing a drum loop with the envelope set to
no envelope
(top panel), and the pitch sequence in the step sequencer is going from -8 to +8 semitone by semitone (bottom panel). Experiment with the
step duration
(
best results at 16
th
notes
) and the
Note length
parameters of the sequencer, as shown in the figure!
Try the Physical Boundaries demo (in which the yellow loop player is also triggered by a step-sequencer) for a more advanced and musical effect!
3.8.2 Using the sequencer with the free duration loop player
The features described above apply to both
BPM-adaptive
and
fixed duration
loop players.
Free duration
loop players respond differently when receiving step sequencer events, and they do it by increasing or decreasing their playback speed proportionally to the pitch of each note event received. The audible effect is hard to describe, so better try it by yourself, by just changing the loop player subtype in the previous demo!
3.8.3 Applying LFOs to wavefiles
We already introduced LFOs in section 1.5 and we will cover them in detail in next chapter. In the current section we just briefly describe the results of applying an LFO to the three different subtypes of loop players.
TIP
: Applying an
LFO
to
BPM-adaptive
and
fixed duration
loop players, creates an amplitude modulation or tremolo, around the loop player current amplitude value. While this is a very common effect, the fact that (1) the period of the LFO can be a multiple or a subdivision of the beat, and that (2) the LFO has also a “sample and hold” parameter that can be set to any tempo-dependent note duration (section 4.3.5), makes very easy to create synchronized tremolos. Playing with the LFO waveform (i.e. sine, square, random, etc.) and its amplitude, will also produce very different results.
TIP
: Applying an LFO to a
Free duration
loop player, will modulate its playback speed around its current value. When the current loop speed is set to zero or near, the loop will play backwards and forwards, not unlike a scratch-effect. In other cases, the loop will keep playing faster/slower.
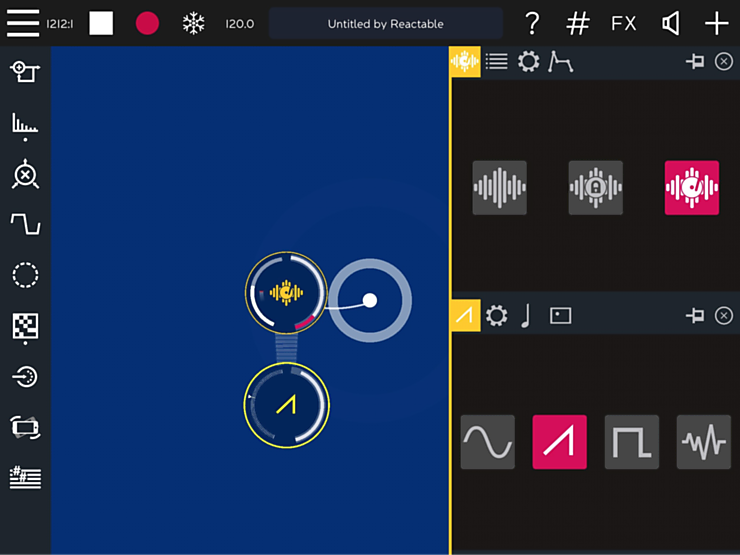
Applying an LFO to a Free duration loop player.
Basic and more
Advanced Scratch Demos .
3.9 Wrap Up
In this chapter we have covered loop players, which surely constitute ROTOR most used type of objects. We have seen how to load your own wavefiles into them, how to use the three different loop players subtypes ROTOR offers, how to set them to behave as masters or as slaves, or how to combine them with sequencers or LFOs.
In the next chapter we will cover Effects.