In chapter 3 we fully explored how to take maximum profit of ROTOR’s loops and wavefiles. But ROTOR is also a full-fledged synthesizer which takes its inspiration from the modular systems of the 60s and 70s, and augments them with the potential of digital systems such as samplers, sequencers and digital effects. ROTOR includes the following objects:
You can load and listen to some of the demos we include with ROTOR that do not make use of loops. Because everything is being synthesised and sequenced in real-time, their modification and interaction possibilities become endless!
In this chapter you will start to learn how to produce these kinds of creations and many more!
In chapter 1 we already briefly introduced samplers, synthesizers and sequencers (section 1.6). With this already acquired basic knowledge you should be able to do many things with these types of objects, but if you really want to exploit these objects to the max, this is your chapter!
The dock showing the 2 synths (left, dark blue) and the 2 samplers (right, light blue)
As shown in the figure, ROTOR comes with 2 samplers and 2 synthesizers, and as we will see, both types behave quite similarly.
First, they both play a note every time they are activated. And they can be activated in several ways:
Samplers and synthesizers objects do also share almost identical looks and control possibilities:
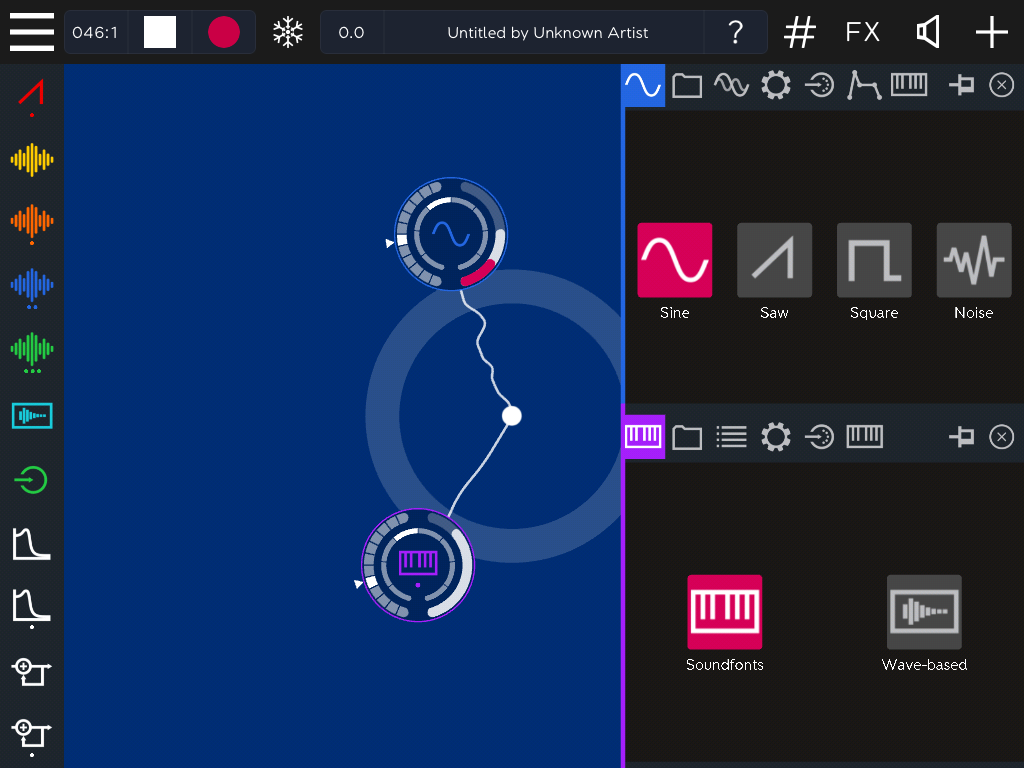
The synthesizer (top) and the sampler (bottom) objects and panels
Samplers and synthesizers mainly differ in the way they create sound, and thus in the type of sound they output:
We will start by studying them together for learning their more basic and common functionalities, after which we will detail their advanced configurations separately.
Load T51 PlayingNotes and first experiment triggering notes by rotating the objects. We observe that each time a rotation takes place, a new note is triggered, and that the two white marks at the left of the objects move accordingly. We will now explain the meaning of the visual feedback presented in these objects left side.
The synthesizer object. The active note is the F (the outer white slot is the 6th out of 12) of the 4th octave (the inner white slot is the 4th)
The left slider of both samplers and synths shows 12 small sectors, and an inner circular arc shows only 8. This inner arc represent the available octaves (thus 8 octaves in total), while the outer left arc represents the notes (12 semitones per octave). Both arcs have always one (and only one) of their sectors highlighted in white. These two white sectors respectively indicate the current base note and octave. As we have just seen, these base values (both note and octave) are modified by rotating the objects, by they also influence other behaviors of the object.
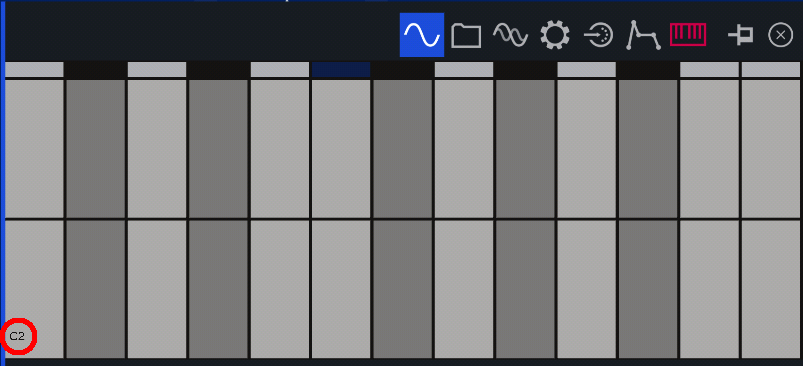
Open one of these objects’ virtual keyboard (double tap the object and select the keyboard icon in the panel that has just opened), and play it.
Keyboard set in the second octave (C2)
The keyboard has 13 columns and 2 rows. These columns correspond to the 12 notes of an octave (plus an additional C which is placed again at the end of the row). You can see indeed that the keys show 2 different shades of grey, the lighter ones corresponding to the white keys of a piano (and the darker to the black ones). The two rows are for covering 2 octaves, and the lower one at the bottom, corresponds to the active octave (inner white mark) selected in the object, which means that the actual range of this virtual keyboard will vary depending on the rotation of the corresponding object on the canvas.
Note that this “2-octaves restriction” does not apply when using an external keyboard or MIDI device. In that case you will be able to use the whole octave range available in the device.
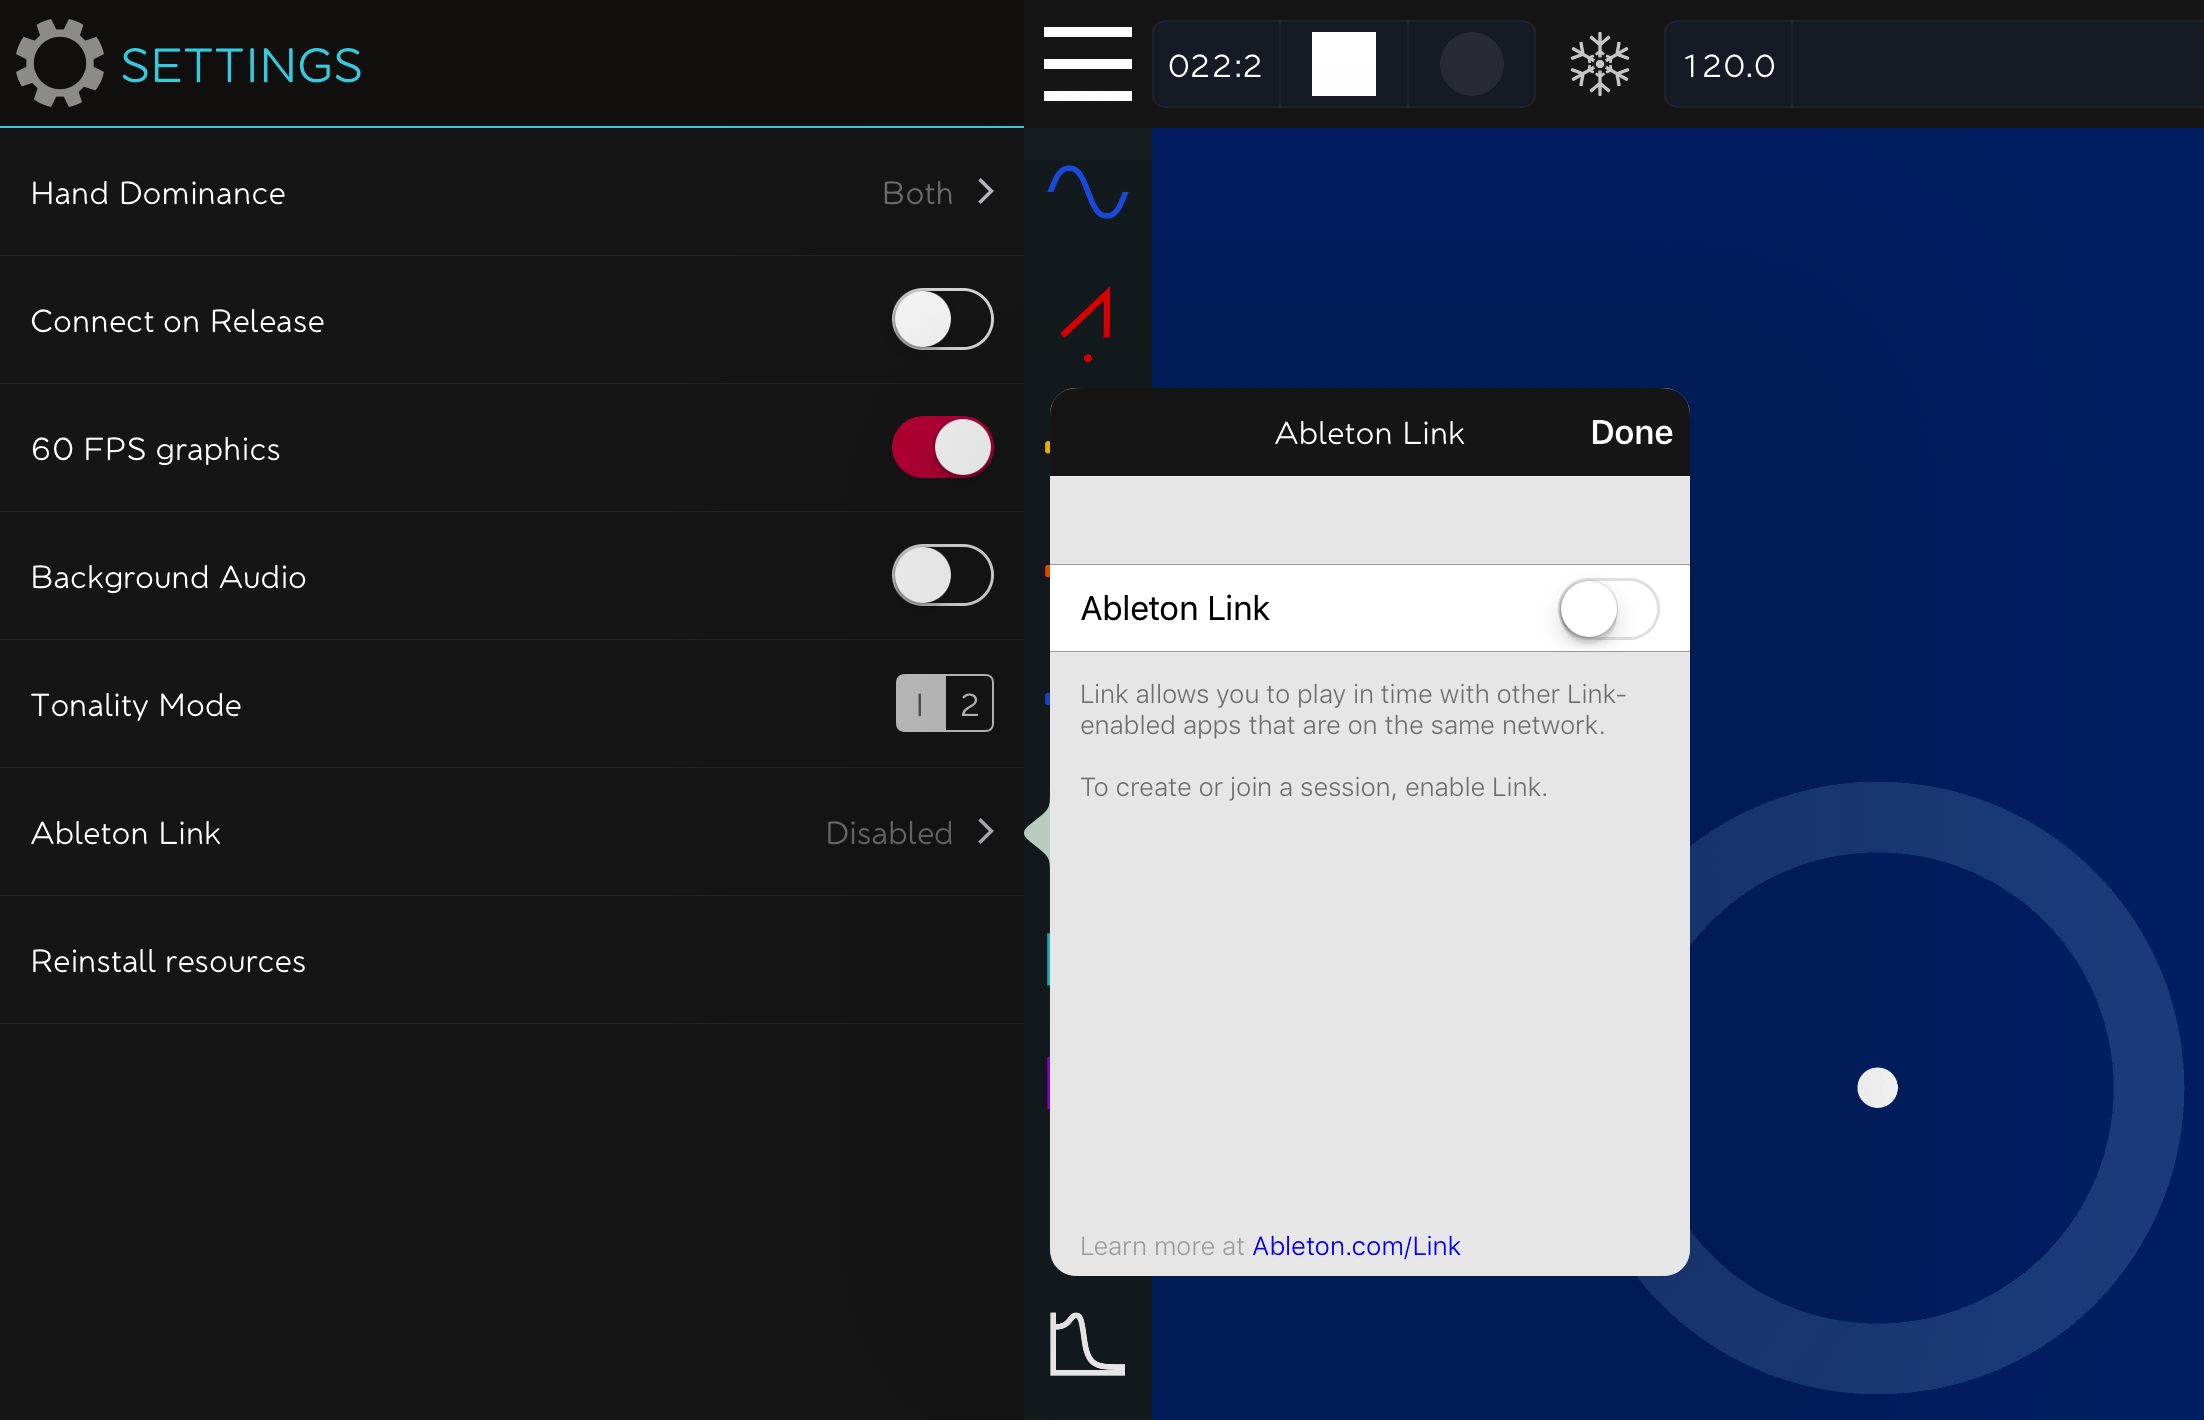
ROTOR can receive MIDI messages from other MIDI-compatible music apps installed on the same device, as well as from external devices. The possibilities will vary depending on your additional software and hardware setup, and in this section we will give you some hints on how to achieve that, but before we will cover how MIDI reception is dealt with from ROTOR’s side.
There are two complementary sources from which ROTOR can receive this MIDI information:
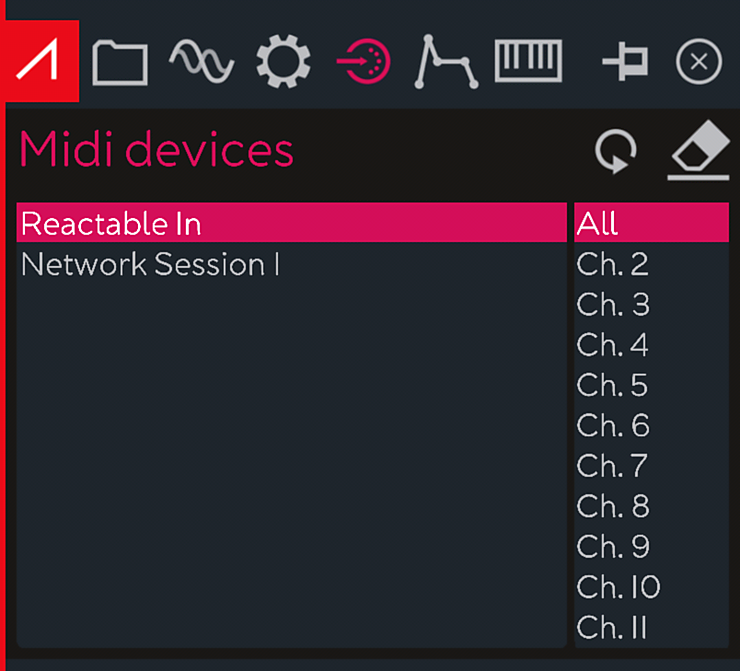
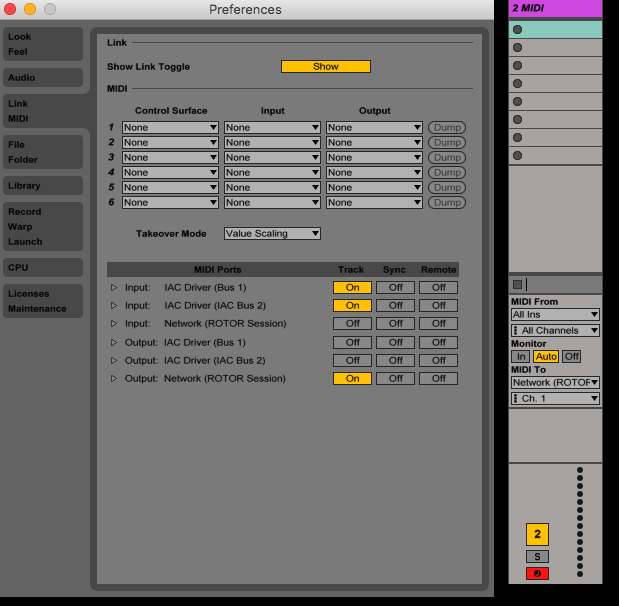
Synthesizers and samplers panels, both include a MIDI icon tab.
The MIDI tab allows to first choose one among the MIDI IN ports availables (usually Reactable In and Network Session) and then select the input channel the object will listen to (1-16 or all). Touch the refresh icon for updating the list of MIDI ports, and the eraser for cancelling MIDI IN.
Using the MIDI tabs will directly assign the information received in the corresponding MIDI input to its associated object (in the figure a synthesizer). Since each object can listen to a different MIDI channel, it would easy to control separately each of the available objects (i.e. 2 synths and 2 samplers). Note that for the moment, only NOTE messages are taken in consideration. The figure also shows a MIDI IN object being applied to a filter.
An additional MIDI IN control object is also available for applying MIDI to objects (such as effects) that don’t explicitly have a MIDI IN tab. In these cases the results of sending MIDI messages to them will vary depending on each object, and would be comparable to controlling them with sequencers. We will cover that in depth in the next chapter devoted to effects.
we following give some hints on how to set up a 3rd party MIDI-compatible app already present in our iPad for outputting MIDI information (note that this will vary with each app).
These apps will be typically received at the Reactable In port.
It is also possible to connect other MIDI devices (software or hardware based) via a local network.
The way in which this must be configured will vary depending on the operating system and the particular software/hardware which you wish to connect.
We will now describe one of the most common use cases among our users which is using a Mac to host the Network MIDI session and configuring Ableton Live
to send MIDI to ROTOR.
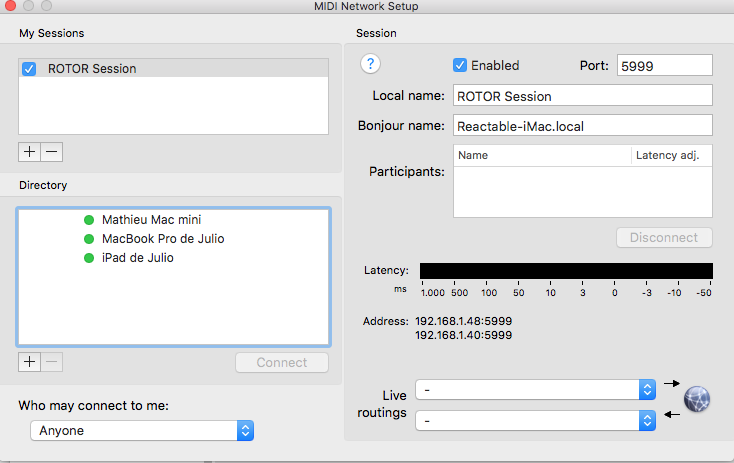
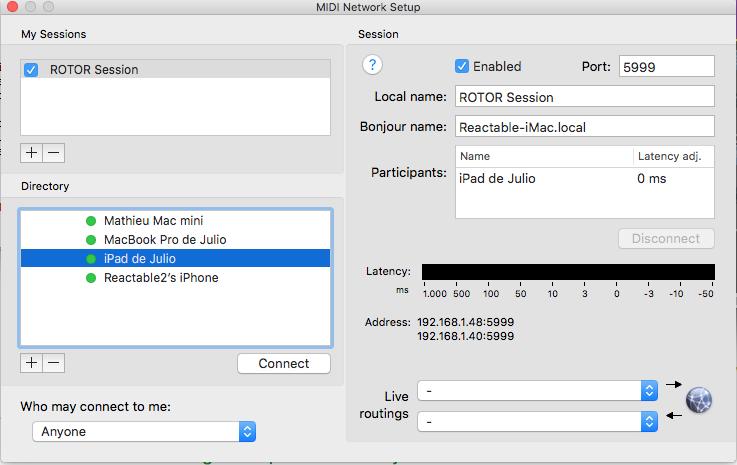
The first step is to configure a Network Session on MacOSX using the Audio MIDI Setup menu. Double click on the Network icon shown in the main window and click + to add a new session. Give your session a name and pick a port which is not currently in use as shown in the screenshot below.
At this point we need to configure Ableton Live! to send MIDI to this network session by activating it in the MIDI preferences as shown below. Once this is done you need to arm a MIDI track for recording and set its MIDI To output port to send to the newly configured Network MIDI session.
The last step is to return to our Network MIDI session and find the iPad device which is running ROTOR in the directory. Highlight this device and click Connect. You will see that it gets added to the list of Participants as shown in the screenshot.
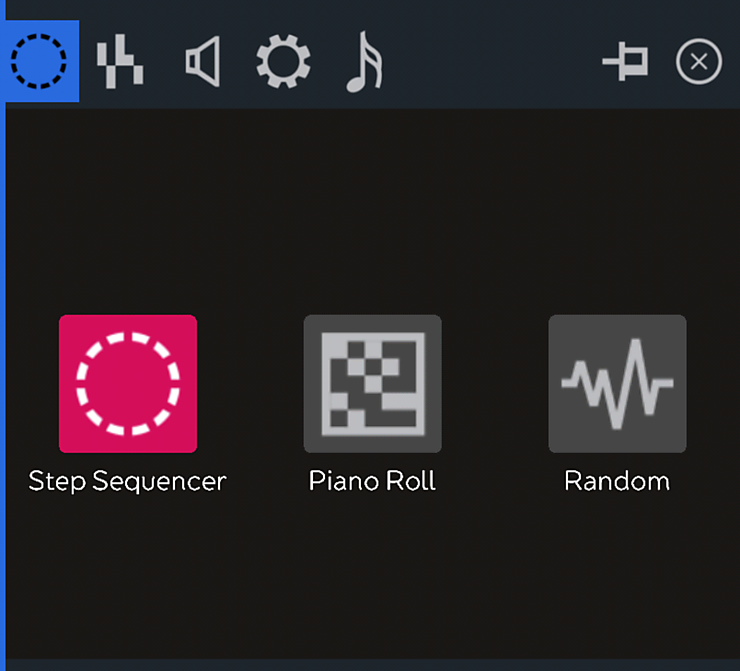
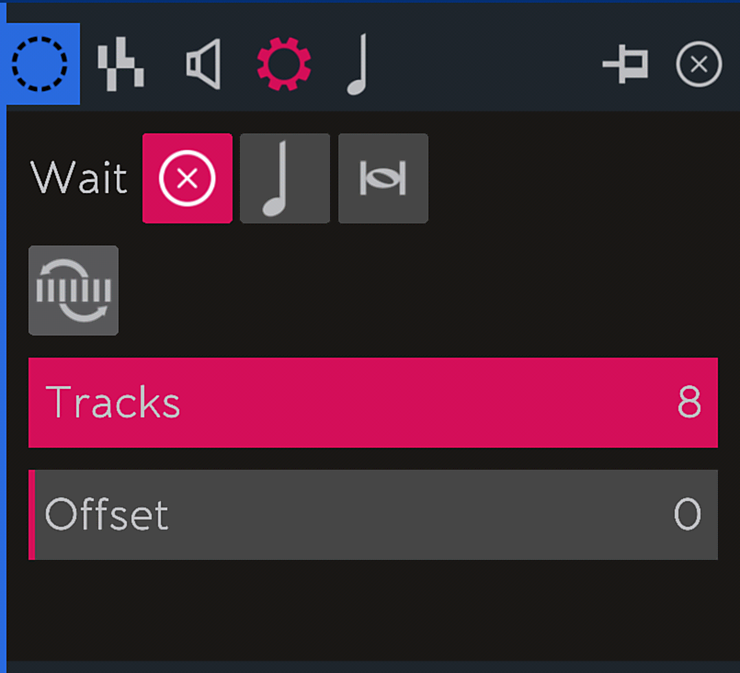
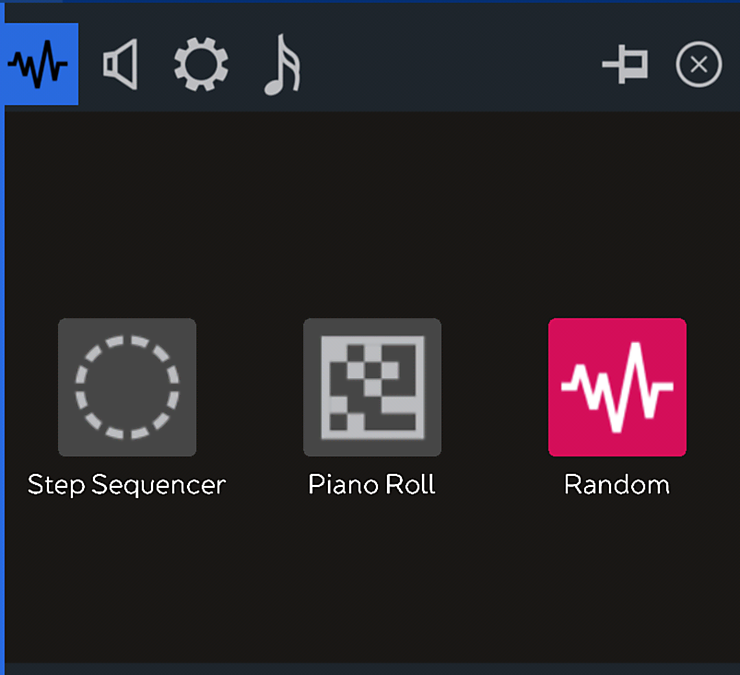
ROTOR includes 2 sequencer objects which can be configured according to 3 different subtypes, namely the monophonic 16-step sequencer, the polyphonic piano-roll sequencer, and the random pitch generator. We will now describe each of them in turn.
The sequencer main panel
This sequencer offers the typical functionality of 16-step sequencers, as first found in many synthesizers from the 70s and early 80s. It allows to:
The main sequencer panel allows the user to draw the relative pitch of each step, within a +/-12 semitones range. Intervals in the middle line (zero) will trigger the base note of the target object.
The amplitude panel allows the user to draw the amplitude level of each step.
The settings panel allows the user to:
You can load Physical Boundaries to test all the aforementioned features.
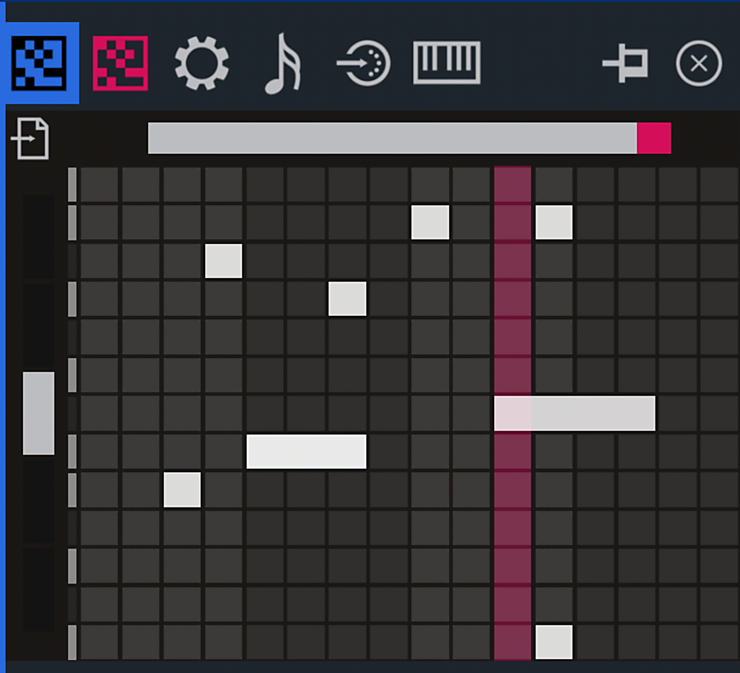
This sequencer subtype behaves like a reduced version of the typical piano-roll sequencer found in most sequencing softwares. Its main differences with the aforementioned 16-step sequencer are:
The piano-roll panel allows to edit notes manually like in any conventional sequencer. It also allows to record (in loop mode) from an external MIDI device.
The Wait, Auto-advance, Number of tracks, and Offset settings, behave exactly like in the 16-steps version.
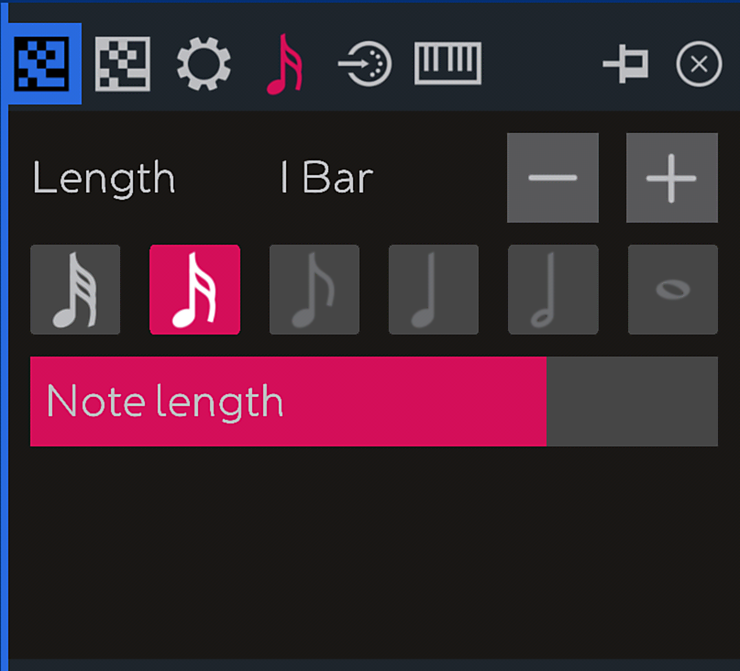
Whereas, as it name clearly suggests, the length of the sequence in the aforementioned 16-step version cannot be changed, we can now set the number of bars of each sequence, touching the [-] [+] icons.
This sequencer also incorporates the keyboard and MIDI panels already available in samplers and synthesizers, for the purpose of recording the incoming NOTE messages into the current sequence.
The 3rd and last sequencer subtype is also the simplest one to set up and use. Its settings are like the ones found in the 16-step sequencer’s minus the main sequencer panel. This is so because it also behaves like it, except that note intervals are now randomly generated, within a range of +/-12 semitones. It is great for adding some unexpected variations, specially when used in combination with the tonalizer, which we introduce in the next section.
We now know how to tell the synthesizers and the samplers which notes to play, in several different manners:
We will now see how we can guarantee that, whatever we will do, the notes they receive are only the “correct” notes.
The tonalizer was introduced in section 2.1.5, and we also used the tonalizer in chapter 3 when dealing with master/slave loops (section 3.6), but the tonalizer is also especially powerful when combined with samplers and sequencers.
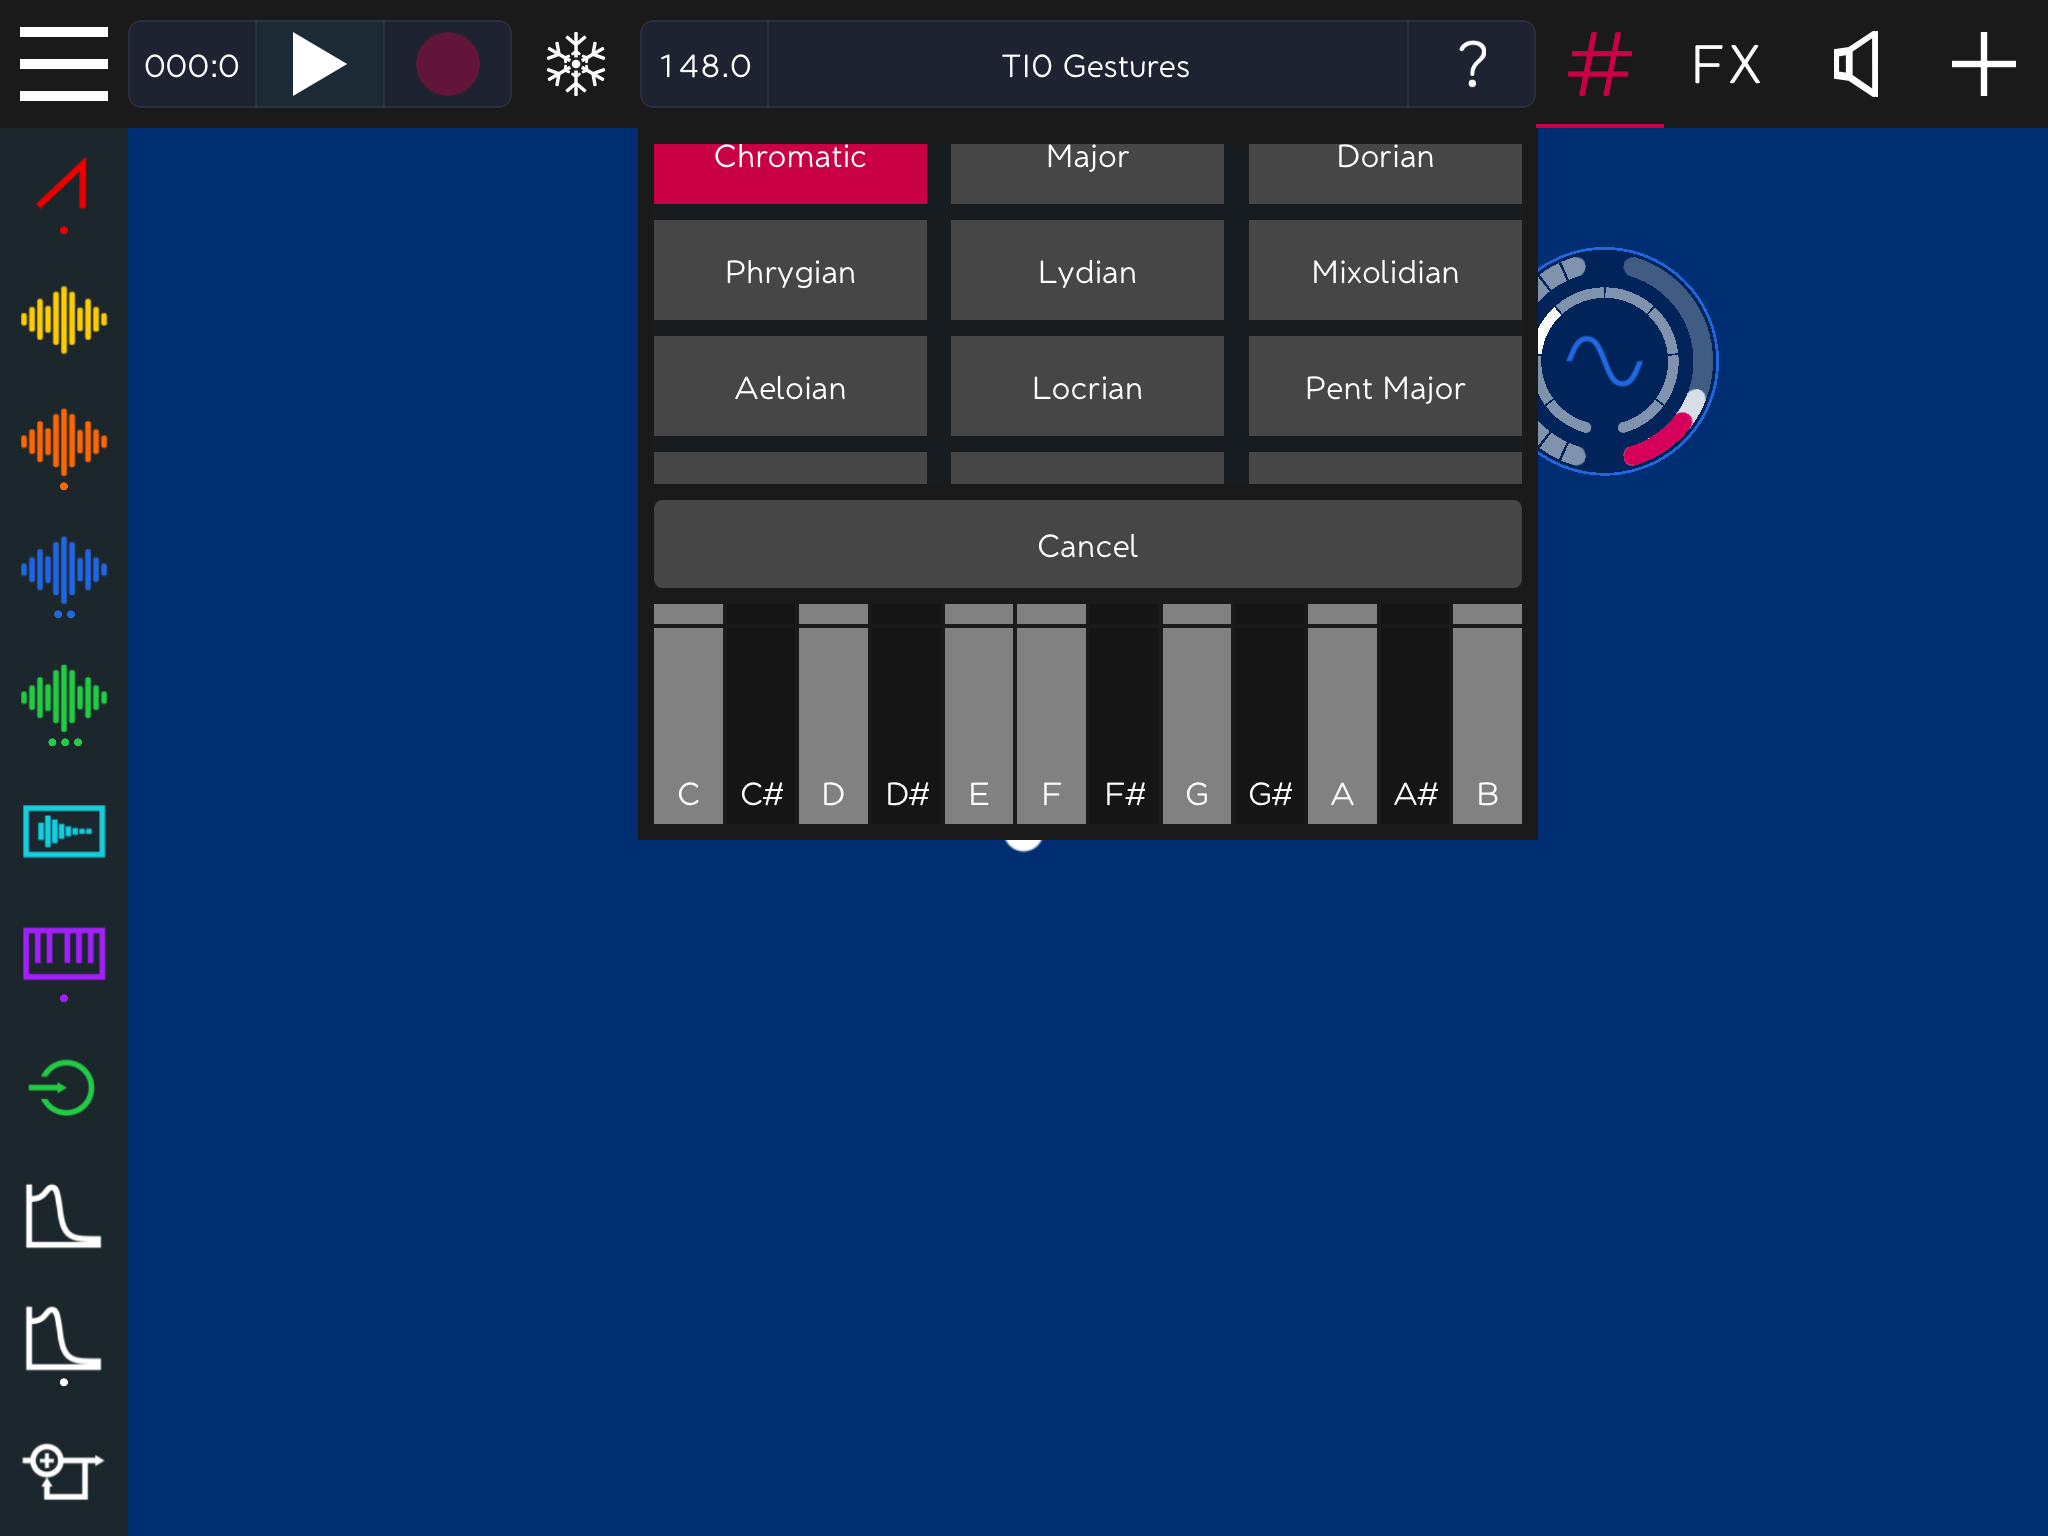
If you load tutorial T52 Tonalizer you will observe that almost nothing has changed from tutorial T51 PlayingNotes, except that some notes seem to be missing now from the outer left arcs of both objects. This is so because we have set the tonalizer to play on a different scale to that of the previous example, which was following the default chromatic scale that contains all of the possible notes. We have now only 7 distinct regions, instead of the full 12 from the previous example. In particular we have set up a C Phrygian mode, which will be responsible for giving an arabic-spanish-gypsy flavor to the resulting melodies.
In section 2.1.5 we introduced the Tonalizer, and in section 3.6 we used the Automatic Tonalizer in combination with master/slave loops. This automatic option (which is computed using at least one master wavefile) will also affect all the notes played by synthesizers and samplers.
TIP: In ROTOR by enabling the Automatic Tonalizer and setting some tonal loops to be Master, it becomes very simple to play melodic lines, arpeggios, etc. always in key with the loop material being used.
Apart from this simpler and automatic behavior, we will now see how to manually define your own tonality settings. Imagine that you have a piece in which similar melodic material (e.g. arpeggios) needs to be played through a sequence of different chords.
Load the demo Giant Leaps to play with a session created for use both with the automatic tonalizer (using a loop of piano chord progressions set to Master mode) and manual mode with six carefully chosen presets. First check it out in automatic mode, then switch to manual and start changing between the presets as it plays to come up with your own original harmonic progressions.
The following bullet points summarizes ROTOR tonality control possibilities:
For setting your own tonality presets, do the following:
Partial view of the scales list
The following table lists all the scales available in ROTOR with the notes available for each. Note that these notes are relative (i.e. 0 refers here to the selected key or root, and not to a C note).
| Scale/Chord | Notes |
Allowed notes (relative to the root) |
Short description |
|---|---|---|---|
| Chromatic | 12 | 0, 1, 2, 3, 4, 5, 6, 7, 8, 9, 10, 11 | All notes are allowed. |
| Major | 7 | 0, 2, 4, 5, 7, 9, 11 | Also called Ionian mode, this is the standard and ubiquitous major scale. |
| Dorian | 7 | 0, 2, 3, 5, 7, 9, 10 | A minor mode which is symmetric (the sequences of intervals are the same both ascending and descending). |
| Phrygian | 7 | 0, 1, 3, 5, 7, 8, 10 | A minor mode, similar to the Aeolian but with the second scale degree flattened. |
| Lydian | 7 | 0, 2, 4, 6, 7, 9, 11 | A major mode with an augmented fourth. |
| Mixolydian | 7 | 0, 2, 4, 5, 7, 9, 10 | A major mode sometimes referred to as dominant as it is built on the fifth degree of the major scale. It is common in jazz and rock music. |
| Aeolian | 7 | 0, 2, 3, 5, 7, 8, 10 | This is the natural and ubiquitous minor scale, which tends to sound sadder that its major counterpart. |
| Locrian | 7 | 0, 1, 3, 5, 6, 8, 10 | A minor mode where the second and fifth scale degrees are diminished. |
| Pent Major | 5 | 0, 2, 4, 7, 9 | A simpler 5 note scale in a major mood |
| Pent Minor | 5 | 0, 3, 5, 7, 10 | A simpler 5 note scale in a minor mood, very common in blues music and many other folk traditions |
| Blues | 6 | 0, 3, 5, 6, 7, 10 | A more complex blues scale with 6 notes. This scale has a slightly more dissonant feel to it than the minor pentatonic due to an extra semitone interval in the middle of the progression. |
| Harmonic Minor | 0, 2, 3, 5, 7, 8, 11 | Provides a harmonic base for chords in a minor mood. | |
| Melodic Minor | 7 | 0, 2, 3, 5, 7, 9, 11 | Another minor mood but more ambiguous than the harmonic minor |
| Major Triad | 3 | 0, 4, 7 | The 3 notes which make up a major triad. |
| Minor Triad | 3 | 0, 3, 7 | The 3 notes which make up a minor triad. |
| Diminished Triad | 3 | 0, 3, 6, 9 | This diminished progression can help in creating tension |
| Sus4 Chord | 3 | 0, 5, 7 | The third degree of a major/minor triad is raised to a perfect fourth, thus creating ambiguity and the expectation of release. |
| Maj7 Chord | 4 | 0, 4, 7, 11 | This is a major triad plus an extra note, the 7th degree of the major scale and it can be useful in moving the harmony in a different direction e.g. changing key. |
| 7 Chord | 4 | 0, 4, 7, 10 | This is a diminished version of the major 7 chord with the final degree flattened by 1 semitone. |
| m7 Chord | 4 | 0, 3, 7, 10 | This is the 7 chord with the 2nd note also flattened. |
| m7b5 Chord | 4 | 0, 3, 6, 10 | This is like the m7 chord, with the third degree also flattened. |
| mMaj7 Chord | 4 | 0, 3, 7, 11 | This is a diminished version of the major 7 chord with the second degree flattened by 1 semitone. |
Until now we have explored all the possibilities ROTOR offers us, around the concepts of notes, octaves, keyboards, external MIDI, sequencers and the tonalizer. It is now time to finally study the main features and differences of synthesizers and samplers. We will thus not focus anymore in how to play notes but rather in how to refine our sounds. We will start with synthesizers.
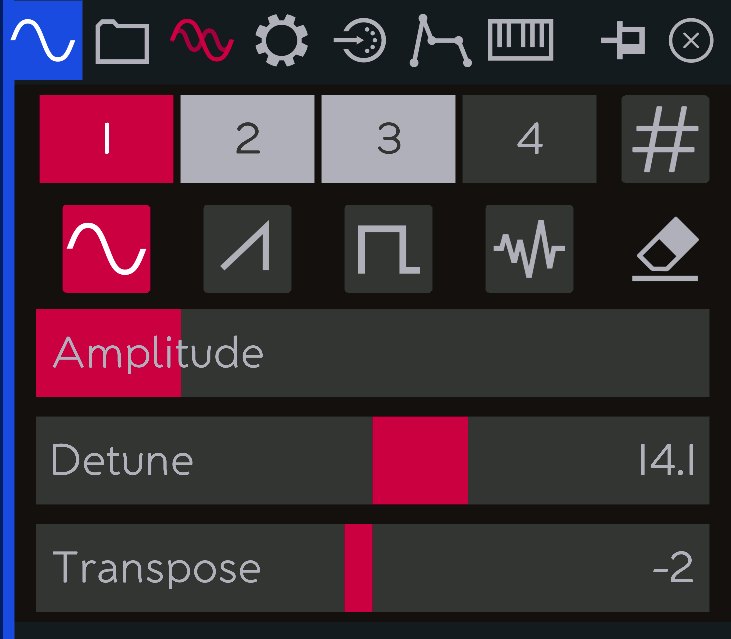
In most synthesizers, sounds are created starting from basic mathematical waveforms such as sine, square, sawtooth or triangle waves, plus white noise. All of these waveforms are available within ROTOR’s synthesizer object. On top of that, for each synthesizer object, ROTOR allows to:
All these parameters can be set from the different tabs available in the Synthesizer panel.
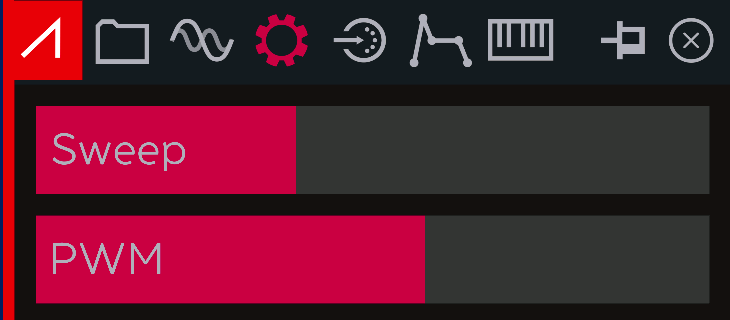
This tab allows to select the waveform of the main oscillator. You can choose between:
Each of these waveforms has a characteristic sound which is defined by a different presence of harmonics. If you don’t know how these waveforms sound just place one oscillator in the canvas and keep switching between the 4 available waveforms from its main panel.
To add more depth and richness to these synthetic waveforms, up to 4 additional sub-oscillators can be added. This can be done from the sub-oscillators tab.
Note that in conventional additive synthesis both the main oscillator and the corresponding sub-oscillators are always sine waveforms. While ROTOR allows to do so, it also allows to create less conventional synthesizers in which is oscillator/sub-oscillator can be of a different waveform type.
The suboscillators configuration panel
The 4 squares at the top of this tab, correspond to each of the 4 optionally available sub-oscillators. For each of them, you will be able to define its waveform, its amplitude, its detune factor and its transposition. Note that these 3 parameters (amplitude, detune and transposition) are always relative to the main oscillator.
TIP: Note that checking the # icon ON, will apply tonalizer correction to each independent transposed sub-oscillator! This means that the transpose intervals indicated might vary depending on which base note will be playing and how the tonality is set, producing polyphonic voicings that will always respect the selected tonality or mode.
White noise presents a special case that is worth discussing. It sounds really like the static noise in a detuned FM radio; it has no defined pitch or frequency and you cannot therefore play any melody with it. As a consequence, the detune and transposition parameters do not have any impact on its sound either; only amplitude will thus have an effect, determining how much noise will be added to the multiple oscillators mix. If you are new to sound synthesis, you might indeed ask yourself the question: why would anyone want to use white noise? But you would be surprised at how useful white noise can be. In combination with other oscillators it can add some crispiness to the sound. Alone and in combination with envelopes and filters, it can be used for creating percussive sounds and effects such as wind, etc.
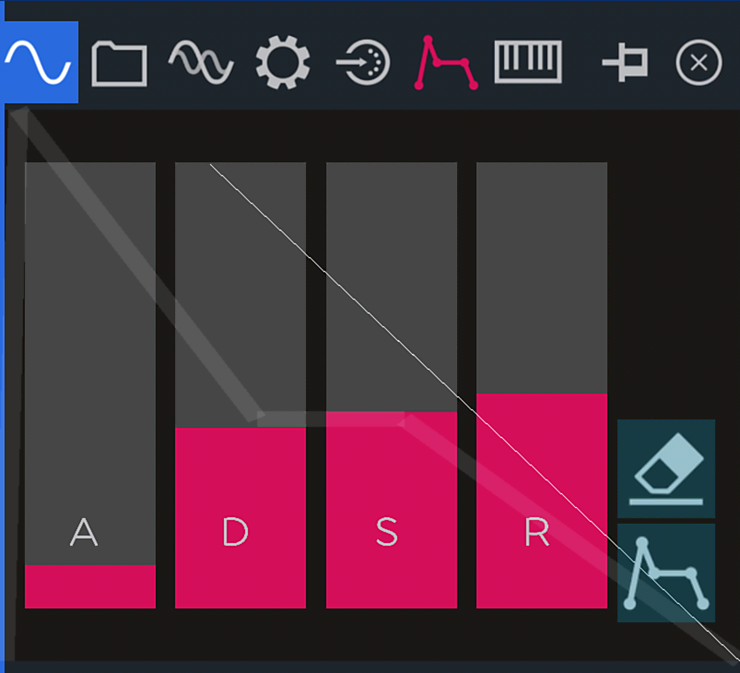
The envelope for the synthesizer works the same way as the envelope we have already seen for the loop player (section 3.7.2) and effects (section 4.4). You can control the Attack, Decay, Sustain Level and Release, and the envelope is triggered every time a new note starts, no matter how it has been triggered (e.g. by a rotor, the virtual keyboard, the sequencer, etc.). This envelope applies to the whole synthesizer (i.e. there are no separate envelopes for each sub-oscillator).
For those not acquainted with what Attack, Decay, Sustain Level, and Release (typically known as ADSR) mean, we will give here a short explanation of these concepts and how they particularly apply in ROTOR.
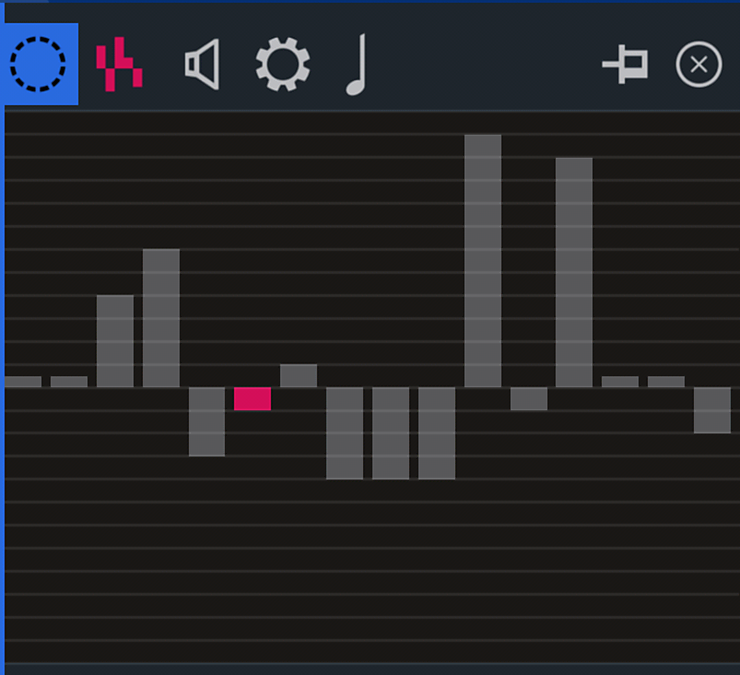
Note that ROTOR provides a special visual feedback that indicates the instantaneous sound level of the synthesizer as a combination of its main volume (in white) and the envelope (in magenta). You can test it with a basic setup as the one shown in this figure.
Set a slow tempo (such as 60 BPM or slower), put a random sequencer playing long notes (e.g. whole notes). This will give you enough time to watch and listen to the whole envelope evolution. Apply it to a synthesizer and play with the synthesizer envelope and with the sequencer note length. Listen and watch the effects.
We have seen that each time we rotate a sampler or a synthesizer object (with a rotor, or capturing it and dragging it with the finger) a new note is played. Note however that in these cases (unlike when playing with a keyboard or when using the sequencer or an external MIDI device), the rotation does not produce an end of note. This means that if the synthesizer has a certain sustain, when played by rotation, the sound will be maintained at this sustain level indefinitely, until a new note arrives.
TIP: If you need drones or infinitely sustainable sounds, set the sustain of the synthesizer to non-zero, and play it by rotation, not from a keyboard!
You like a synthesizer sound you have just created fiddling with all the parameters? Use the presets tab for saving and loading these presets. Selecting the Save icon will open a keyboard panel that will let name your new preset.
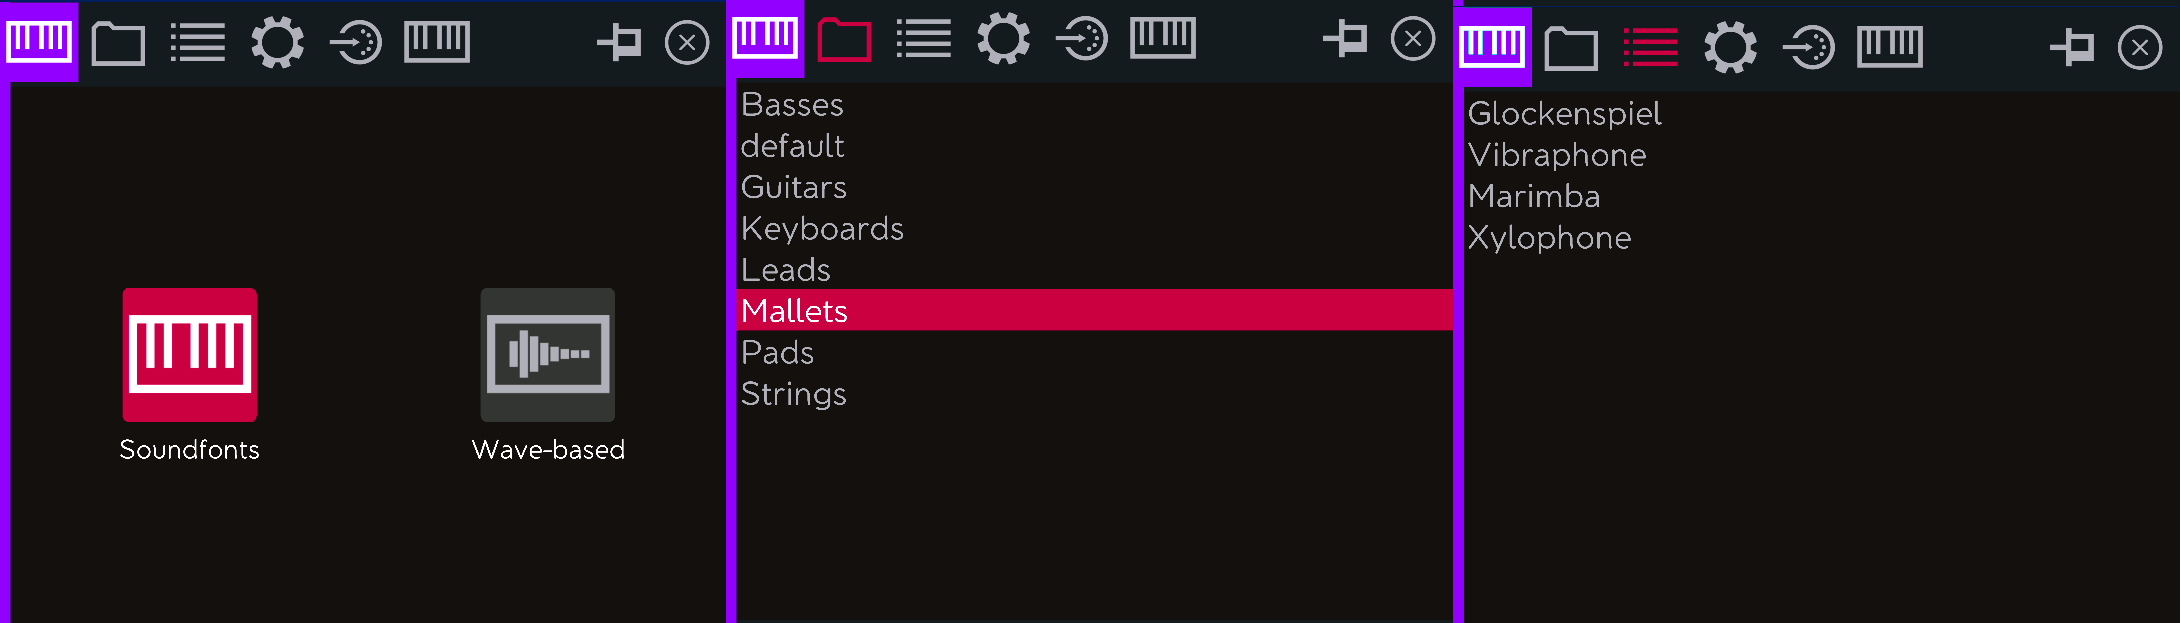
Whereas synthesizers use basic mathematical waves for creating synthetic sounds, samplers use digitally recorded fragments of real music instruments for emulating them. ROTOR comes with two samplers’ subtypes: SoundFonts and Wave-based.
If you select SoundFonts, you will be able to first select an instrument family
(in the Folder icon) and then a particular instrument from that family (in the List icon).
Once selected, this instrument can be used in exactly the same way we have seen with synthesizers, i.e. with virtual or external keyboards, with the sequencer, etc.
The SoundFont subtype does not allow many settings, since all their configuration parameters have been already predefined. Accordingly, opening its Settings panel, will only allow you to change the Gain of the selected instrument.
TIP: ROTOR’s SoundFonts use files in the SF2 format. If you have your own SF2 files or know where to find them (there are many you can download, both payed as well as free in the Internet), you can include them in ROTOR by copying them in ROTOR’s documents folder using iTunes. You can load several SF2 files and they will be accessible from the Folder icon tab. After that, all programs included in the selected file will be accessible from the List icon tab.
As we have already commented in section 5.7.5, playing by rotation does not produce an end of note. This means that if the instrument has been configured with sustain (as it is always the case of organs, bowed strings, wind instruments, etc.) when played by rotation, the sound will be maintained at this sustain level indefinitely, until a new note arrives.
TIP: If you need drones or infinitely sustainable sounds choose an instrument with sustain, and play it by rotation, not from a keyboard!
Selecting the Wave-based subtype will allow you to create your own sampled instruments out of your own wavefiles. Creating professionally sounding sampled instruments is a difficult and laborious task that typically requires recording the same instrument playing different notes. If you have already ever done so, you know what we mean! For this reason, If you want to use some “traditional” instrumental sounds (acoustic, electric or electronic) in your ROTOR compositions, we would probably recommend you to start with the ones we provide you, or to look for SF2 alternatives on the Internet (see the previous section).
That said, ROTOR’s wave-based sampler can be great fun for creating non-traditional sounds, such as an orchestra of kitchen pans and cups, a cats and dogs ensemble, or any special effects. What this subtype allows you is to do in ROTOR is:
In this chapter we have covered many things! You should know by now the main differences between synthesizers and samplers, how to configure them, and how to play melodic lines with them using alternative mechanisms. But before concluding this long chapter, we will be documenting a final topic, telling you what can be achieved by applying Low Frequency Oscillators (LFOs) and the Accelerometer object to Synths and Samplers.
We already used LFOs in chapter 1, where we applied them to effects. In chapter 3, we connected them to loop players and finally, in chapter 4 we covered them in more detail.
TIP: When applied to Synths and Samplers, the LFO object modifies the pitch or frequency of the receiver, but without sending a new note event, and therefore without triggering the envelope. A first consequence of this is that if we want the effect of applying the LFO to be persistent, the receiver (which can be a Synth or a Sampler) needs to have sustain. In the case of Synths, the sustain level will be set on the ADSR panel. In the case of Samplers, the sustain level is already preconfigured in the sound programs.
When the accelerometer is applied to a Synth or a Sampler it will both trigger new notes and also control their amplitude.
You can try the following demos, which apply the LFO and/or the accelerometer to either Synths or Samplers:
This is the end of this manual. We hope you will keep enjoying ROTOR!